GO TO INDEX
Chapter No.3 - Office Automation
Short Questions Answers And Text Book Exercise
Text Book Exercise
B. Respond the following:
1. What is a word processor? Write any three applications of a word processor.Ans: MS WORD PROCESSOR:
Microsoft Word (MS Word) is one of the most famous word-processing software. It was first released and made public in early 1980s by Bill Gates, the founder of Microsoft.
Latest versions of MS Word come as a part of Microsoft Office Suite which includes other software as well like MS Excel, MS PowerPoint MS Access, MS One Note, MS Publisher and MS Outlook.
Applications / Uses / Advantages Of MS Word Processor:
MS Word is still most widely used word-processing software in the world.
- It allows its user to type text and manipulate it.
- MS Word first introduced the concept of WYSIWYG (What You See Is What You Get) by introducing text formatting and document preview exactly as we would get it on a paper.
- It has advanced features like tables, images, advanced formatting and reviewing that give its users the ability to customize their documents as required.
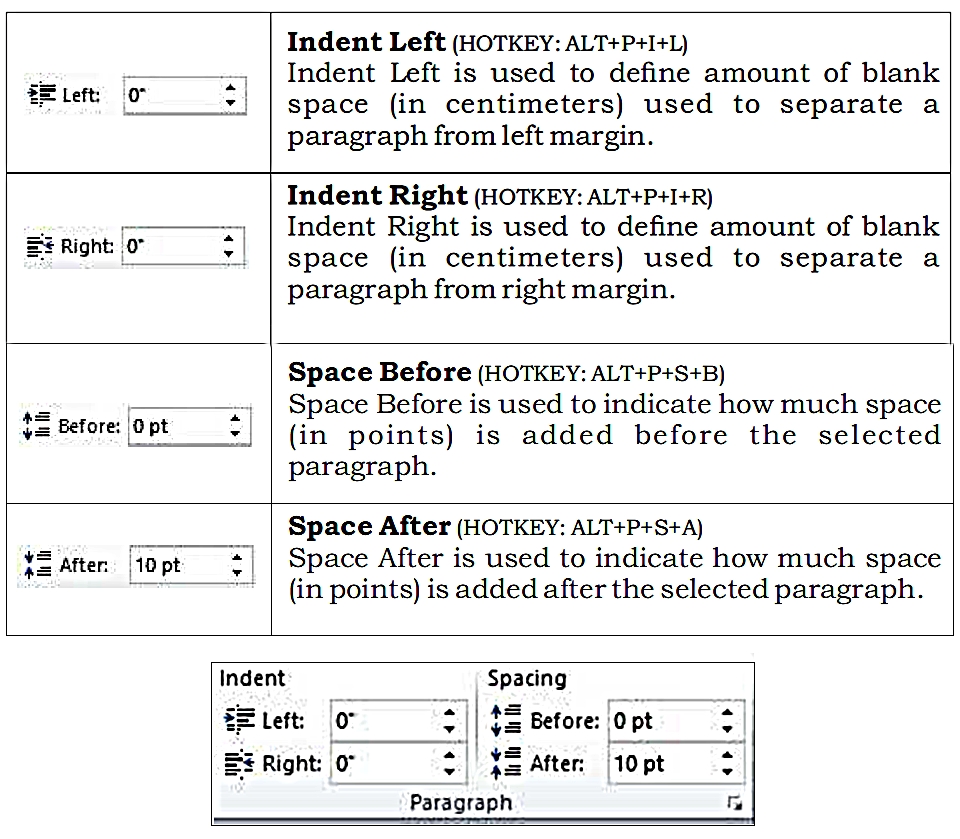
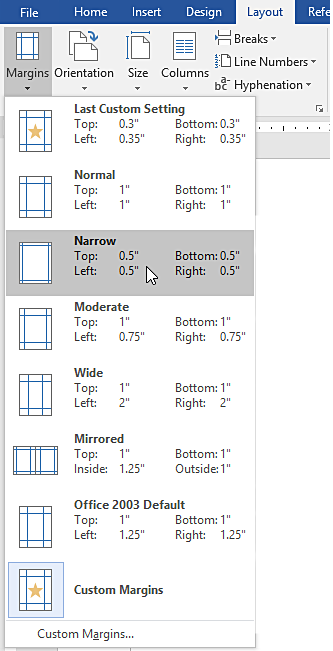
2. Discuss the Margins and Paper Size options in the Page Setup group.
Ans: Margins:
- HOTKEY: ALT+P+M
- A margin is the area or space between the main content of a page and the page edges. This button is used to change the margins of the entire document or selected section.
- By default, a new document's margins are set to Normal, which means it has a one-inch space between the text and each edge.
- Word has a variety of predefined margin sizes to choose from drop down list. Such as normal, narrow, moderate, custom etc.
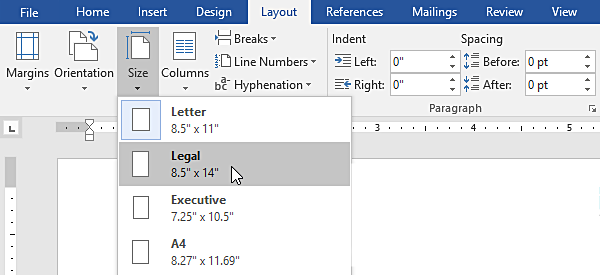
Size:
- HOTKEY: ALT+P+S+Z)
- The size button is used to choose the size of the paper for current section or entire document.
- By default, the page size of a new document is 8.5 inches by 11 inches.
- Word has a variety of predefined page sizes to choose from drop down list. Such as letter, legal, A4, A5, Envelope etc.
- Word also allows users to customize the page size in the Page Setup dialog box.
3. Name and describe two options in Orientation.
Ans:Word offers two page orientation options:
- Landscape and
- Portrait
1. Landscape: means the page is oriented horizontally.
2. Portrait means the page is oriented vertically.

4. How can we apply Margins in a document?
Ans: Word has a variety of predefined margin sizes to choose from the list. We can apply different margins as:
To Use Predefined Margins:
- Select the Layout tab, then click the Margins command.
- A drop-down menu will appear. Click the predefined margin size reuired.
- The margins of the document will be changed.

To Use Custom Margins:
- Word also allows you to customize the size of your margins in the Page Setup dialog box.
- From the Layout tab, click Margins.
- Select Custom Margins from the drop-down menu.
- Selecting Custom Margins.
- The Page Setup dialog box will appear.
- Adjust the values for each margin, then click OK.
- The margins of the document will be changed.

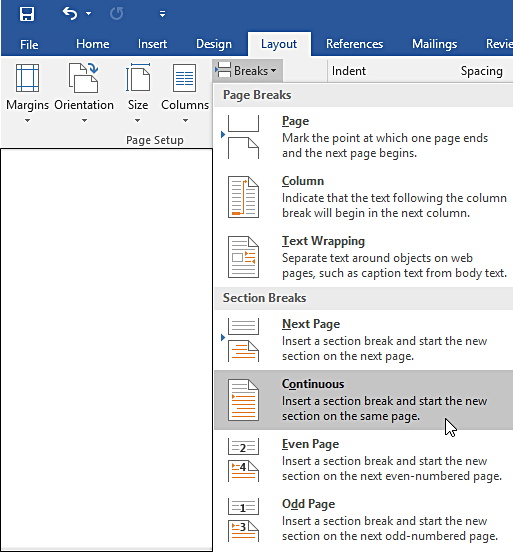
5. Describe the different types of breaks in MS Word.
Ans: BREAKS:
A document break indicates that how the document is to be partitioned to Word processor.
TYPES OF BREAKS IN MS WORD:
There are two types of document breaks, namely:
- Page breaks and
- Section breaks
PAGE BREAKS:
The page breaks partition only the body text of the document.
Types Of Page Breaks:
There are three kinds of page breaks, namely:
-
Simple page breaks:
► Mark the point at which one page ends and the next page begins in the text. It will force all the text behind the cursor onto the next page. -
Column breaks:
► Indicates that if a document have columns, any text to the right of the cursor where the column beak is inserted will begin in the next column. -
Text wrapping breaks:
► A text wrapping break moves any text to the right of the cursor to the next line.
► This kind of break may be particularly useful when a document contains images. It separates text around image on web, such as caption text of an object from body text.
SECTION BREAKS:
The second type of document break is the section break, which partitions both the body text of the document, as well as its associated formatting, such as page margins, headers and footers, page numbers, footnotes, etc.
Types Of Section Breaks:
The section breaks are of four kinds, namely:
-
Next page:
► Insert a next page section break forces the text to the right of the cursor and start the new section on the following or next page.
► It partitions the document into sections, allowing for a change in margins, headers and footers, as well as differently numbered pages and footnotes.
► This is most useful when a document must be divided into chapters or sections. -
Continuous:
► Insert a continuous section break and start the new section on the same page.
► It allows the user to change headers and footers, page numbers, margins, etc.
► This kind of section break is most useful when a document has already been composed in part or in full, but still requires different formatting such as to footnotes, headings, or pagination in separate sections of the work.
► This allows for one section of a document to end and another to begin on the same page. -
Even page:
► Insert an even page section break and it will shift all the text to the right of the cursor to the top of the next even-numbered page. -
Odd page breaks:
► Insert an odd page break and it will move the text to the right of the cursor to the top of the next odd-numbered page.
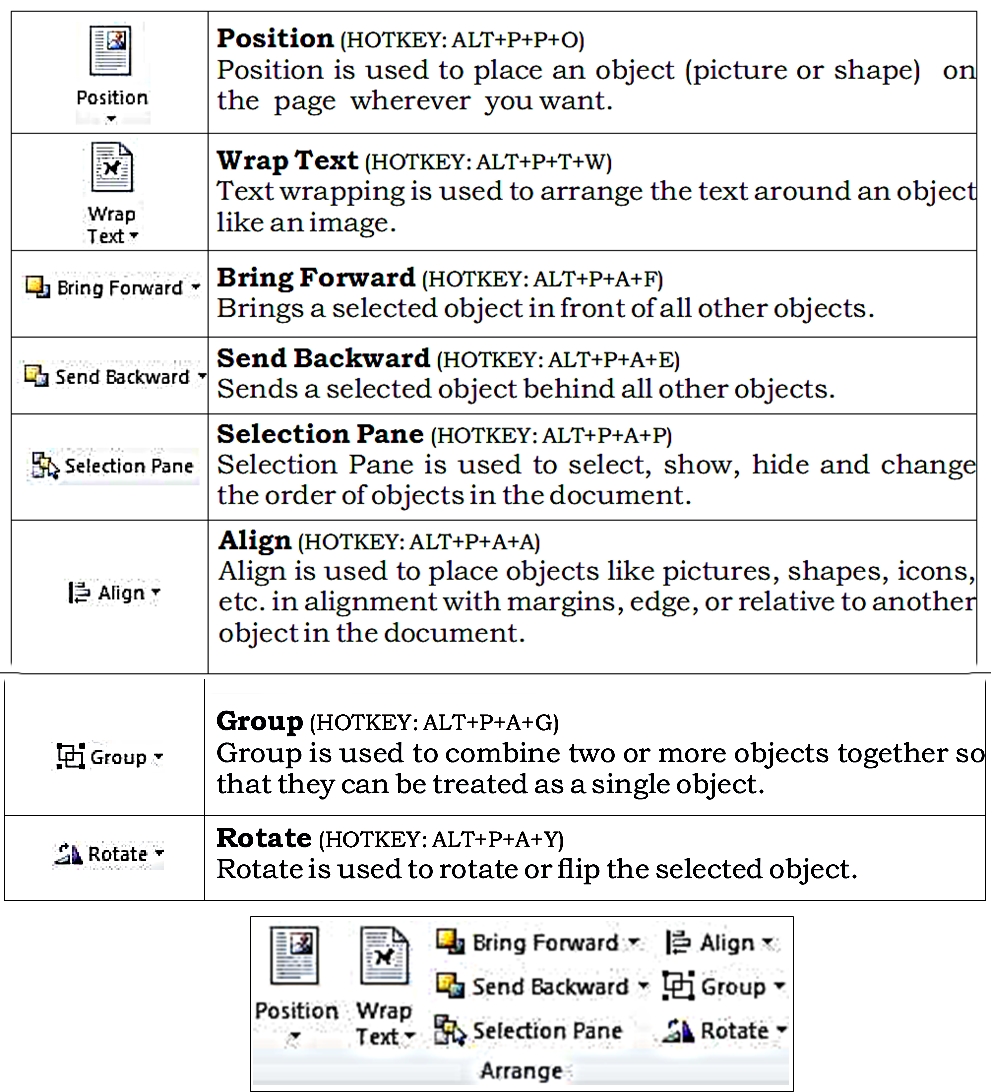
6. Differentiate “Bring Forward” and “Send Backward” options in the Arrange group with example.
Ans: Objects are placed on different levels according to the order in which they were inserted into a document.
Difference Between "Bring Forward" and "Send Backward"
| S.No. | Bring Forward | Send Backward |
|---|---|---|
| 1. | Brings a selected object in front of all other objects. | Sends a selected object behind all other objects. |
| 2. | HOTKEY: ALT+P+A+F | HOTKEY: ALT+P+A+E |
| 3. | Example: Suppose we have placed different text boxes and inserted shape or image in a document which overlap text boxes and hide some part of the text boxes. To bring text box in front of image: Select text box Click page layout tab In Arrange group, click on Bring Forward or Bring to Front. The text box appear on the image. | Example: Suppose we have placed different text boxes in a document and insert shape or image which overlap text boxes and hide them. To send image behind the text: Select image Click page layout tab In Arrange group, click on Send Backward or Send to Back. The image appear behind all text boxes. |

7. Explain the “Columns” option in the Page Setup group.
Ans: COLUMNS:
(HOTKEY: ALT+P+J)
This button is used to split the text into two or more vertical columns.
Explanation:
- Sometimes the information include in a document is best displayed in columns.
- Columns can help improve readability, especially with certain types of documents like newspaper articles, newsletters, and flyers.
- Word also allows to adjust columns by adding column breaks.
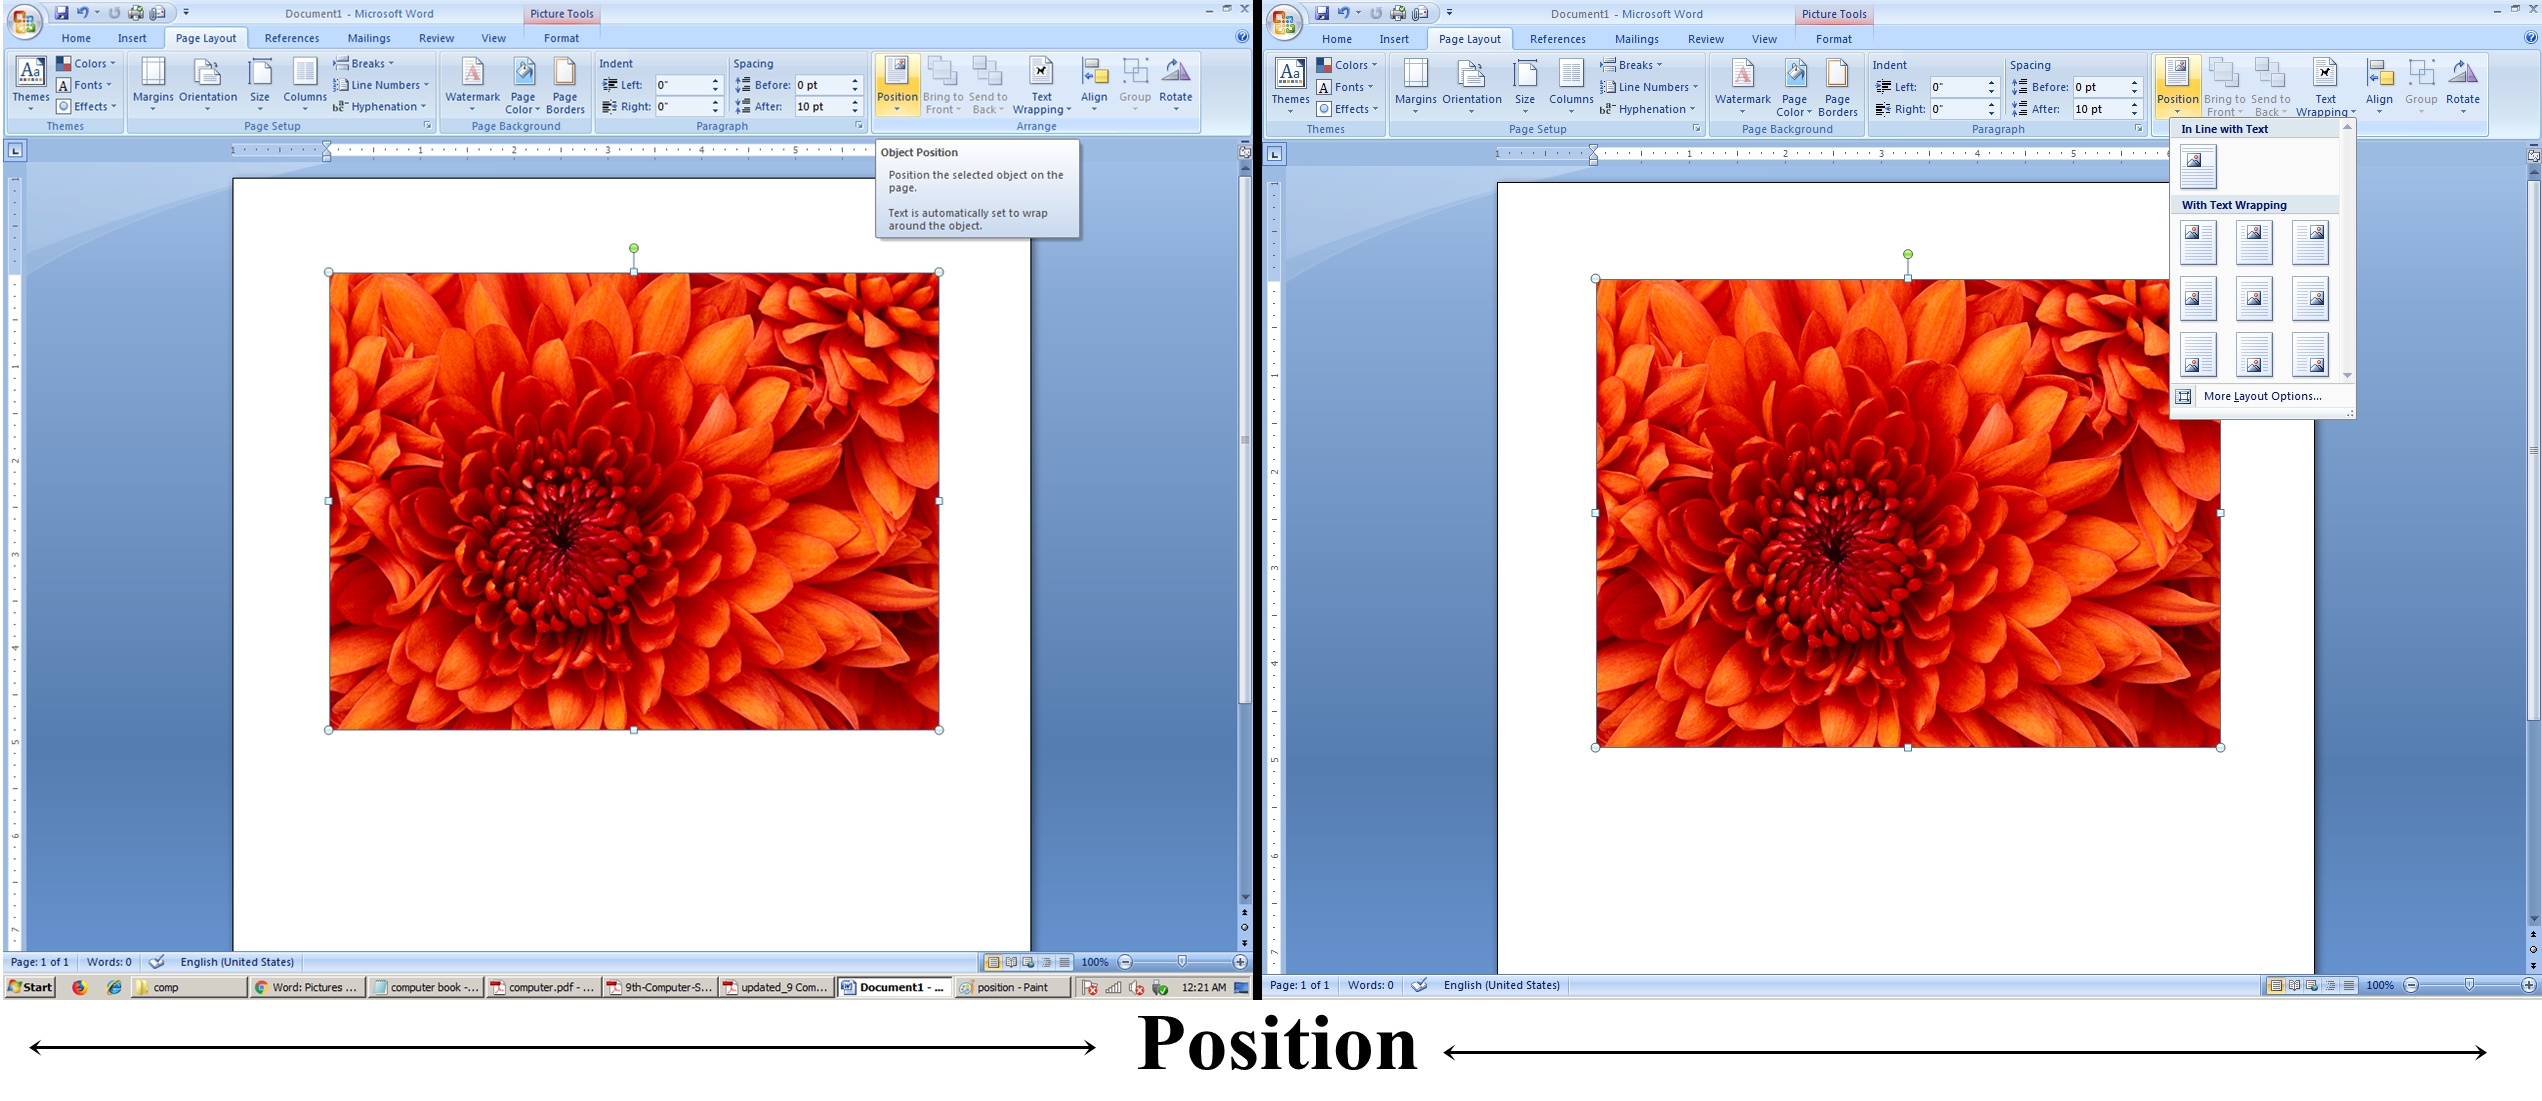
8. List and define Position and Wrap Text option in Arrange Group.
Ans: Position:
Definition: Position is used to place an object (picture or shape) on the page wherever you want.
Explanation: It uses a predefined text wrapping setting, which allows to quickly move the image to a specific location on the page. The text will automatically wrap around the object so it's still easy to read.
List Of Position Options:
- In Line with Text
- Position in Top Left with Square Text Wrapping
- Position in Top Center with Square Text Wrapping
- Position in Top Right with Square Text Wrapping
- Position in Middle Left with Square Text Wrapping
- Position in Middle Center with Square Text Wrapping
- Position in Middle Right with Square Text Wrapping
- Position in Bottom Left with Square Text Wrapping
- Position in Bottom Center with Square Text Wrapping
- Position in Bottom Right with Square Text Wrapping
- More Layout Options
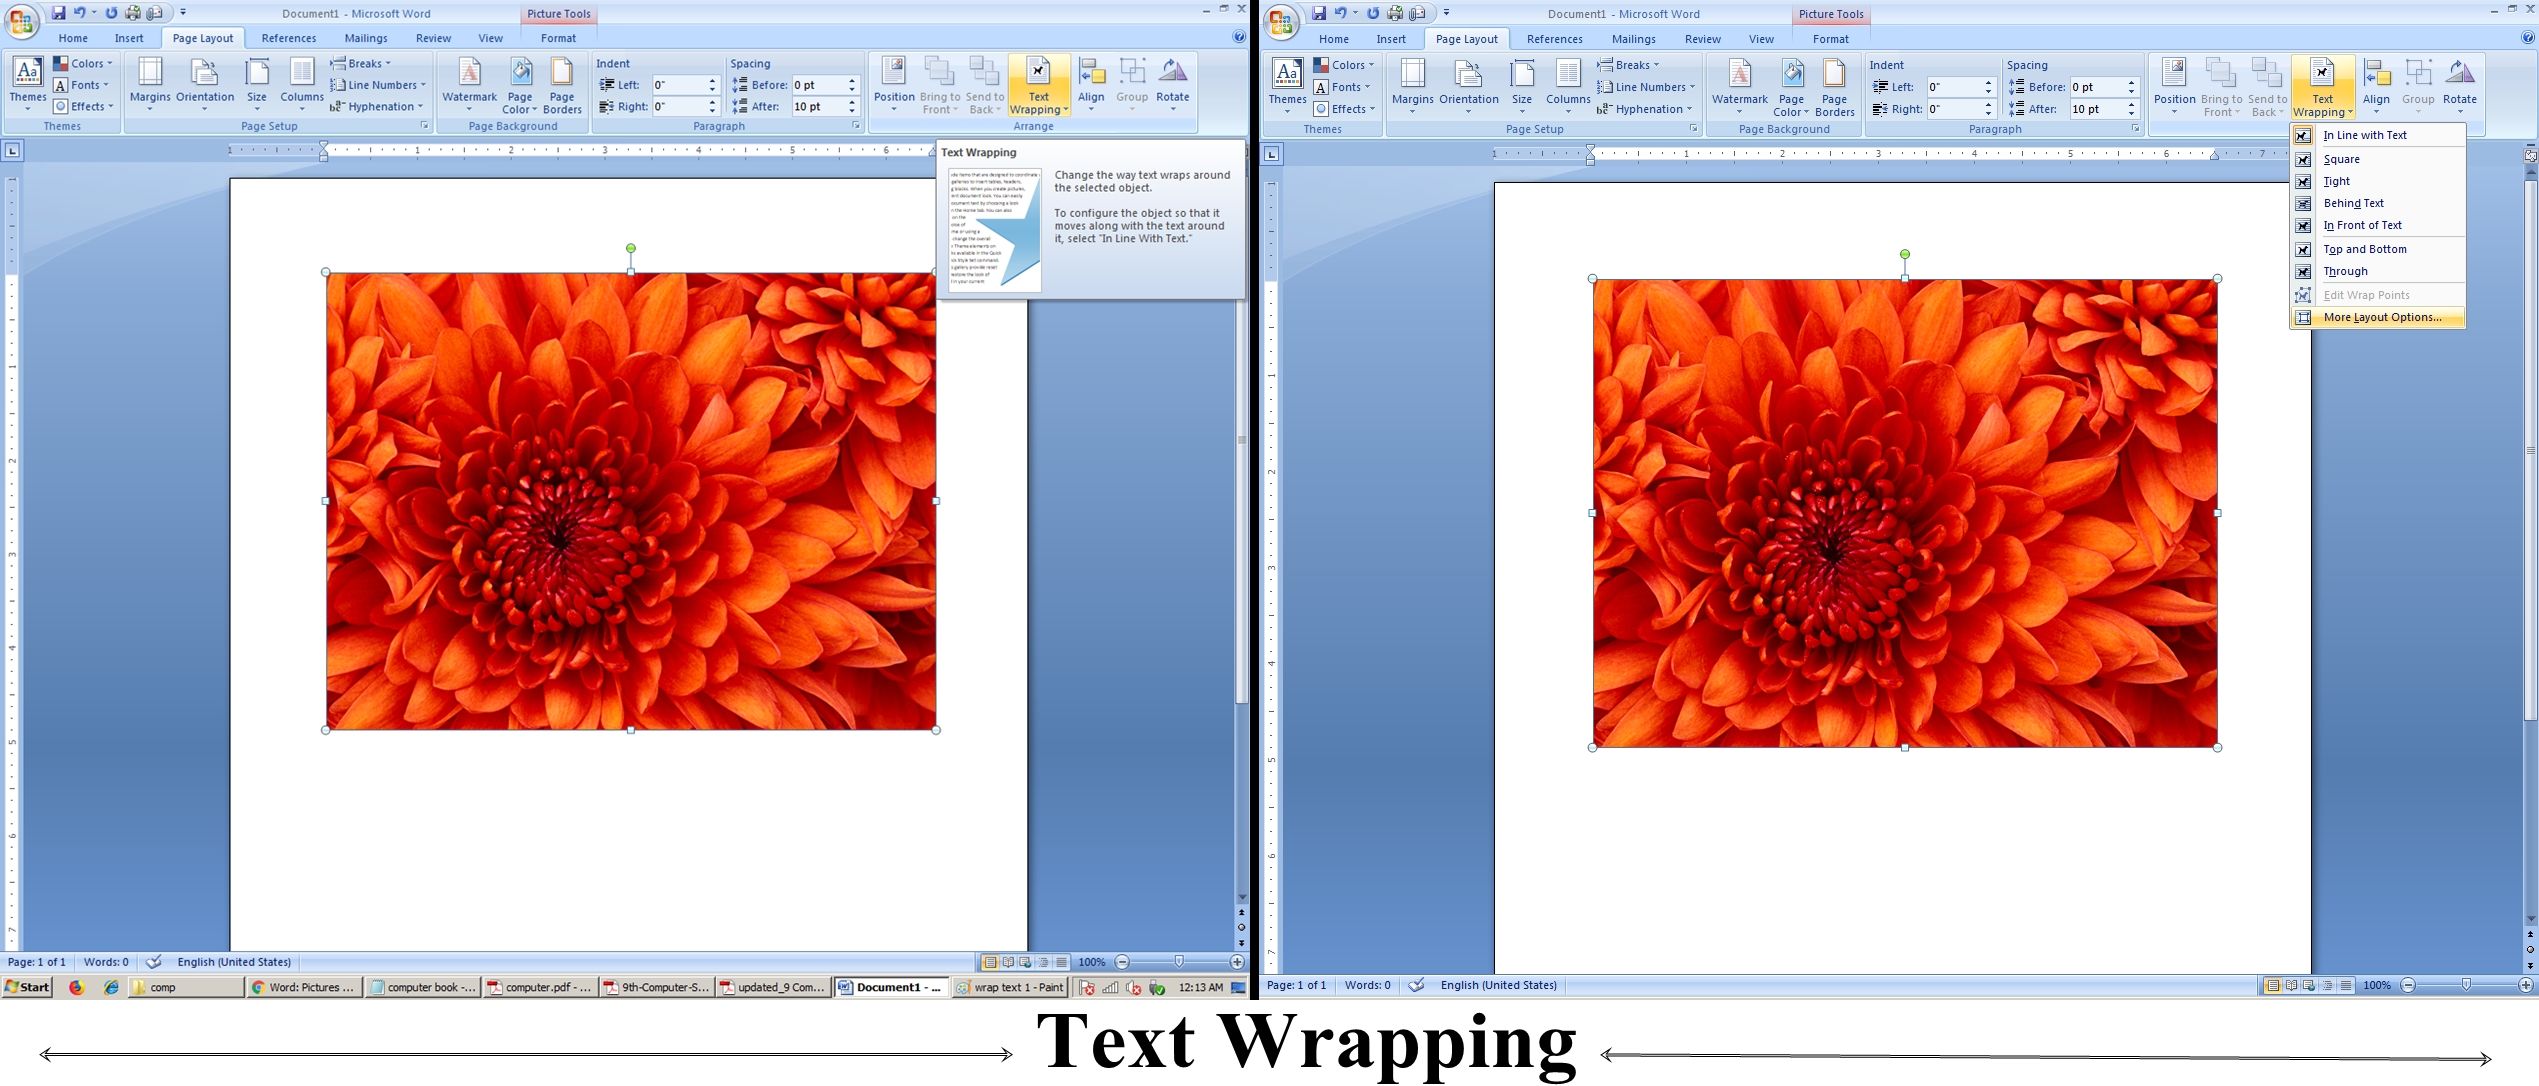
Wrap Text:
Definition: Text wrapping is used to arrange the text around an object like an image.
Explanation: When insert a picture from a file, it's difficult to move it exactly where user want. This is because the text wrapping for the image is set to In Line with Text. User will need to change the text wrapping setting if he wants to move the image freely, or just want the text to wrap around the image in a more natural way.
List Of Wrap Text Options:
- In Line with Text
- Square
- Tight
- Behind Text
- In Front of Text
- Top and Bottom
- Through
- Edit Wrap Points
- More Layout Options
9. In what way does a ToC help book reader?
Ans: ToC provides an overview of the document and allows readers to go directly to specific section or content in the document.
10. Write steps that will multiply 37 by 15 using the formula bar in MS Excel.
Ans: To achieve this, follow these steps:
By Using The Formula Bar
1. Type 37 and 15, in columns A2 and B2, respectively.
2. Select cell C2.
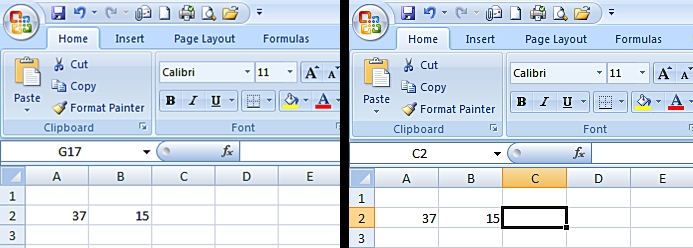
3. Click inside formula bar.
4. Type =A2*B2
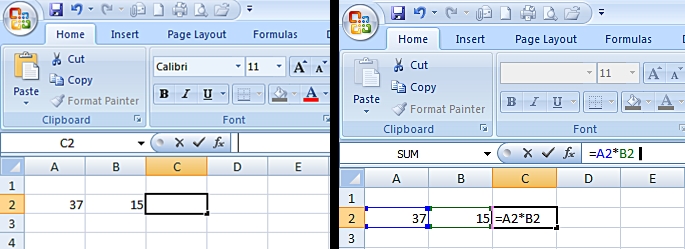
4. Press Enter.
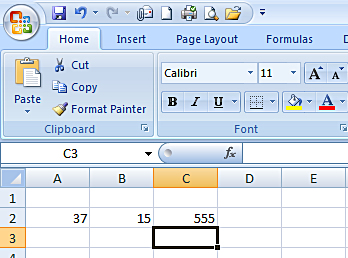
5. The answer (555) will be calculated by MS Excel and displayed in the selected cell (C2) where the multiplication formula was composed.
OR
By Using cells
1. Type 37 and 15, in columns A2 and B2, respectively.
2. Select cell C2.
3. Type = (equal sign) in Cell C2.
4. Select cell A2 in the worksheet by using the mouse or the keyboard.
5. This action places the cell reference A2 in the formula of selected cell.
6. Type *.
7. Select cell B2 in the worksheet by using the mouse or the keyboard to put that cell's reference in the formula of selected cell. The action also appear in formula bar.
8. Press Enter.
9. The answer (555) will be calculated by MS Excel and displayed in the selected cell (C2) where the multiplication formula was composed.

11. Why do we use Watermark in a document? Give some examples of Watermarks.
Ans: Watermark: (HOTKEY: ALT+P+P+W)
A watermark is a faded background image or ghodted text that displays behind the content in a document.
This is often used to indicate that a document is to be treated specially, such as Confidential or Urgent.
Example:
This button is used to insert logos, images or text behind the contents of a page to make a document confidential.
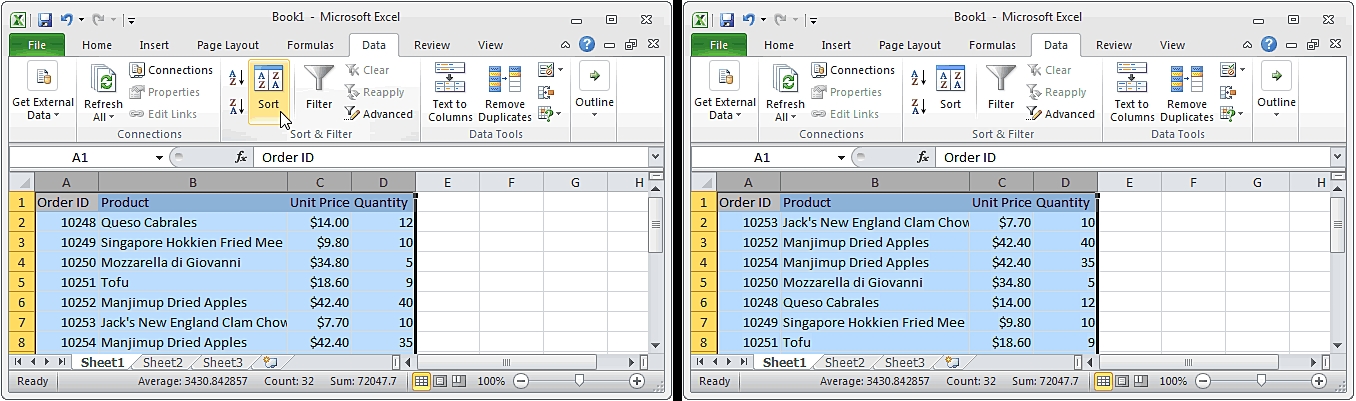
12. List four uses of spreadsheets in business.
Ans: Some Uses Of Spreadsheets In Business:
- Storing Data:
Examples: a list of clients, contact information, employee time sheets, sales, and purchases, etc. - Manipulate And Analyze Data:
Examples: Calculating profit and losses, managing budgets and wages, help in accounting etc. - Visualization Or Presentation:
Examples: Show business performance, and plan future strategy in a graphical way by using charts and tables etc. - Business Accounting:
Examples: Formulas make easy to calculate, handle and store huge data.
| S.No. | A | S.No. | B | C |
|---|---|---|---|---|
| (i) | Wrap Text | (a) | documentation | (i), (b) |
| (ii) | Automatic Table of Contents | (b) | allows to arrange text around an image | (ii), (d) |
| (iii) | Page Setup Group sets | (c) | Show data graphically | (iii), (e) |
| (iv) | Excel is used to | (d) | is created based on heading | (iv), (f) |
| (v) | Charts | (e) | margins, orientation and size | (v), (c) |
| (vi) | Ms Word is widely used for | (f) | organize, display, format and calculate data | (vi), (a) |
Activity
Short Questions Answers
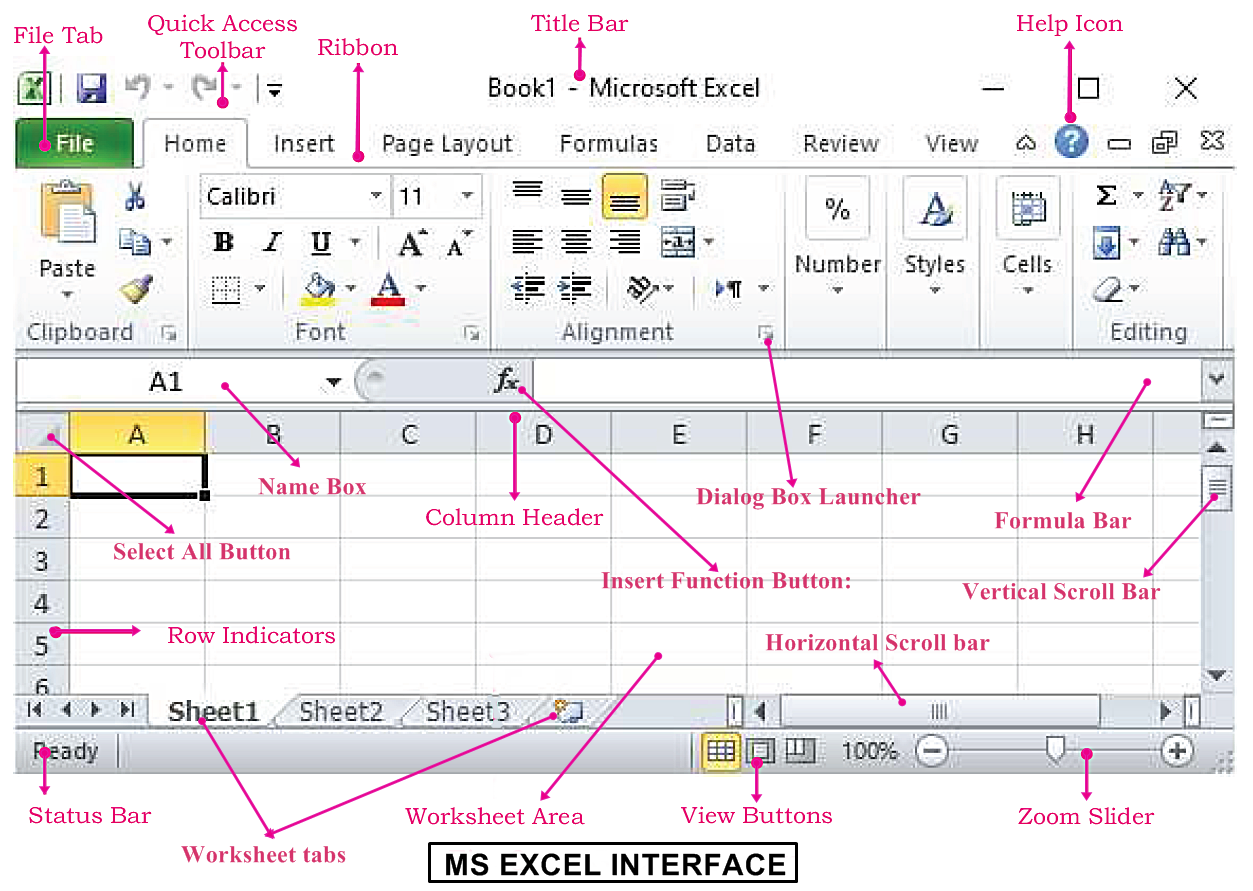
MS word Document layout

Quick Access Tool Bar
Ribbon
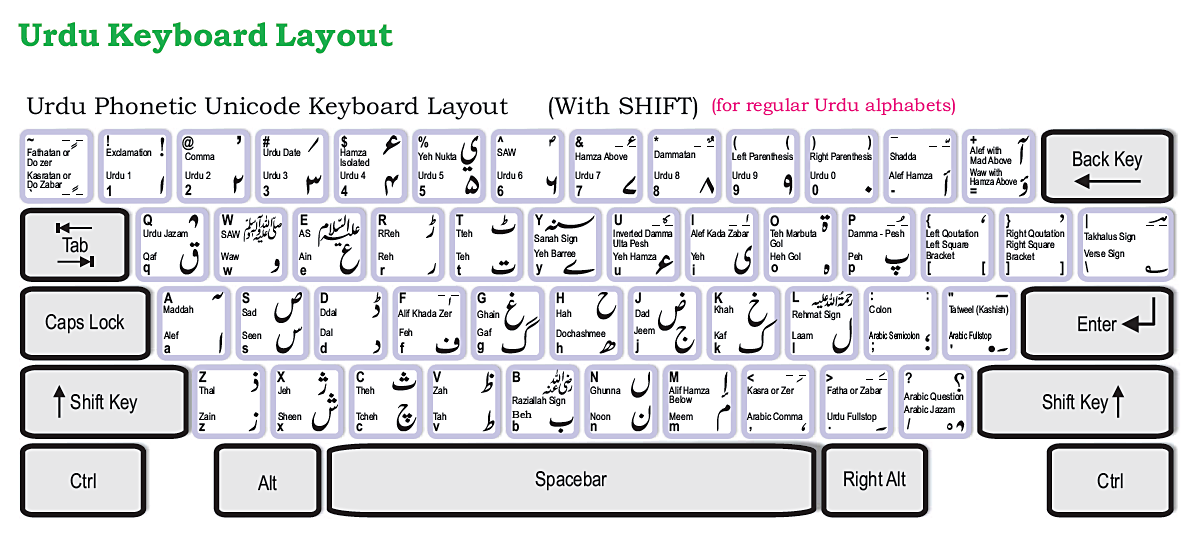
Urdu And Sindhi Keyboard Layout