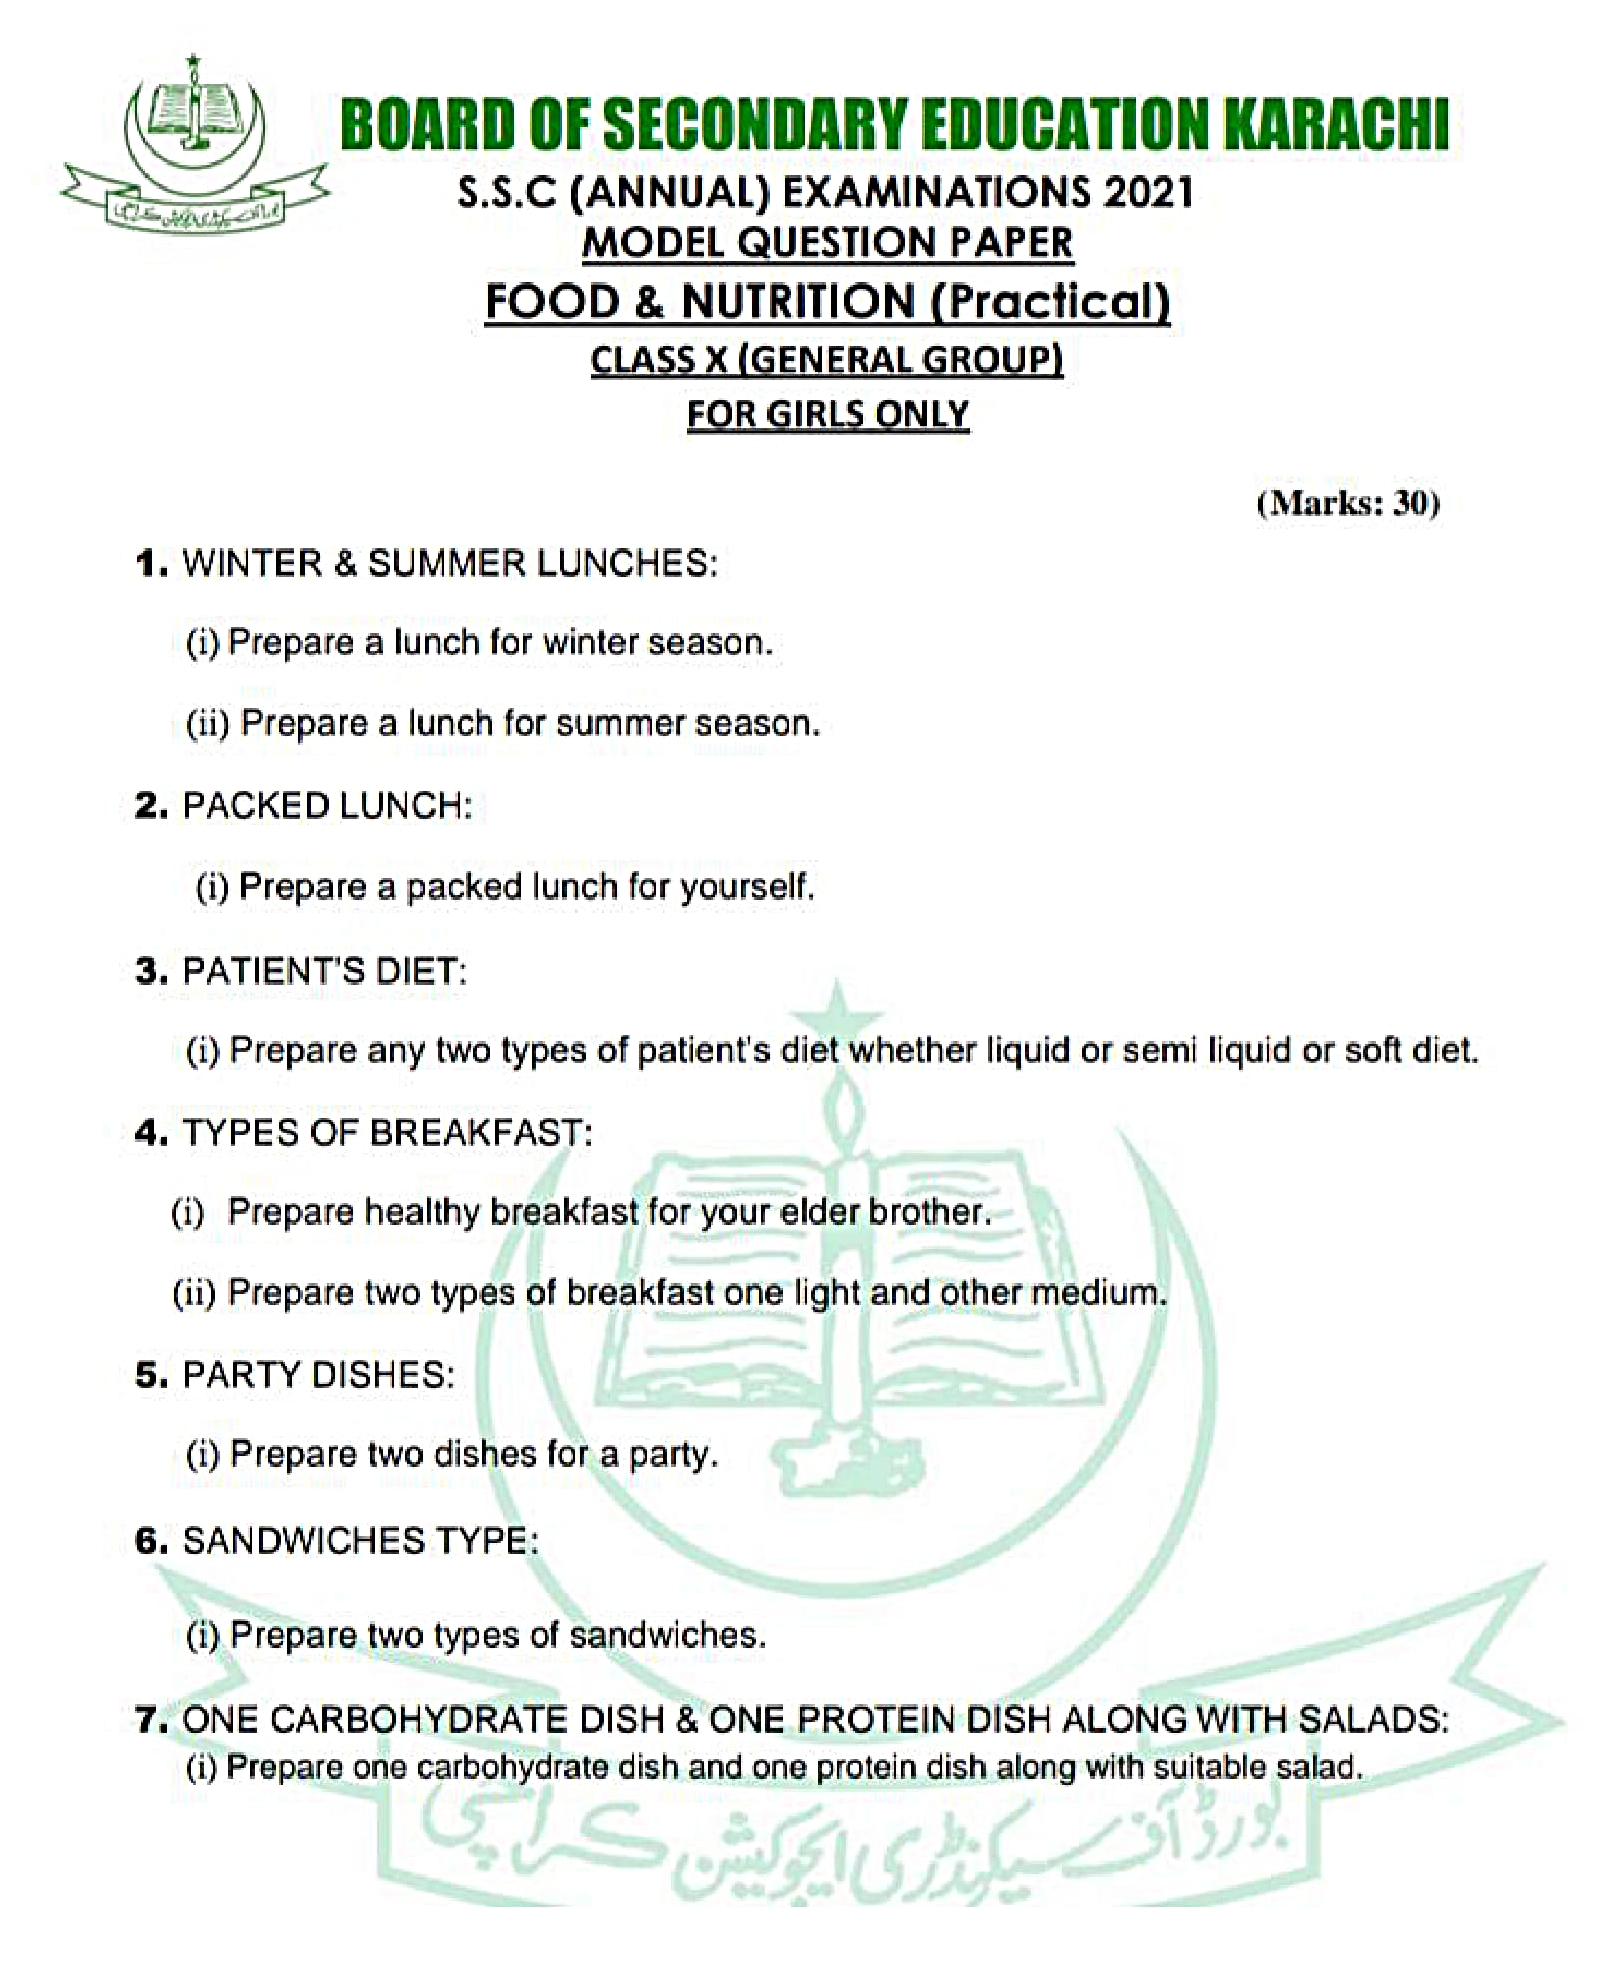
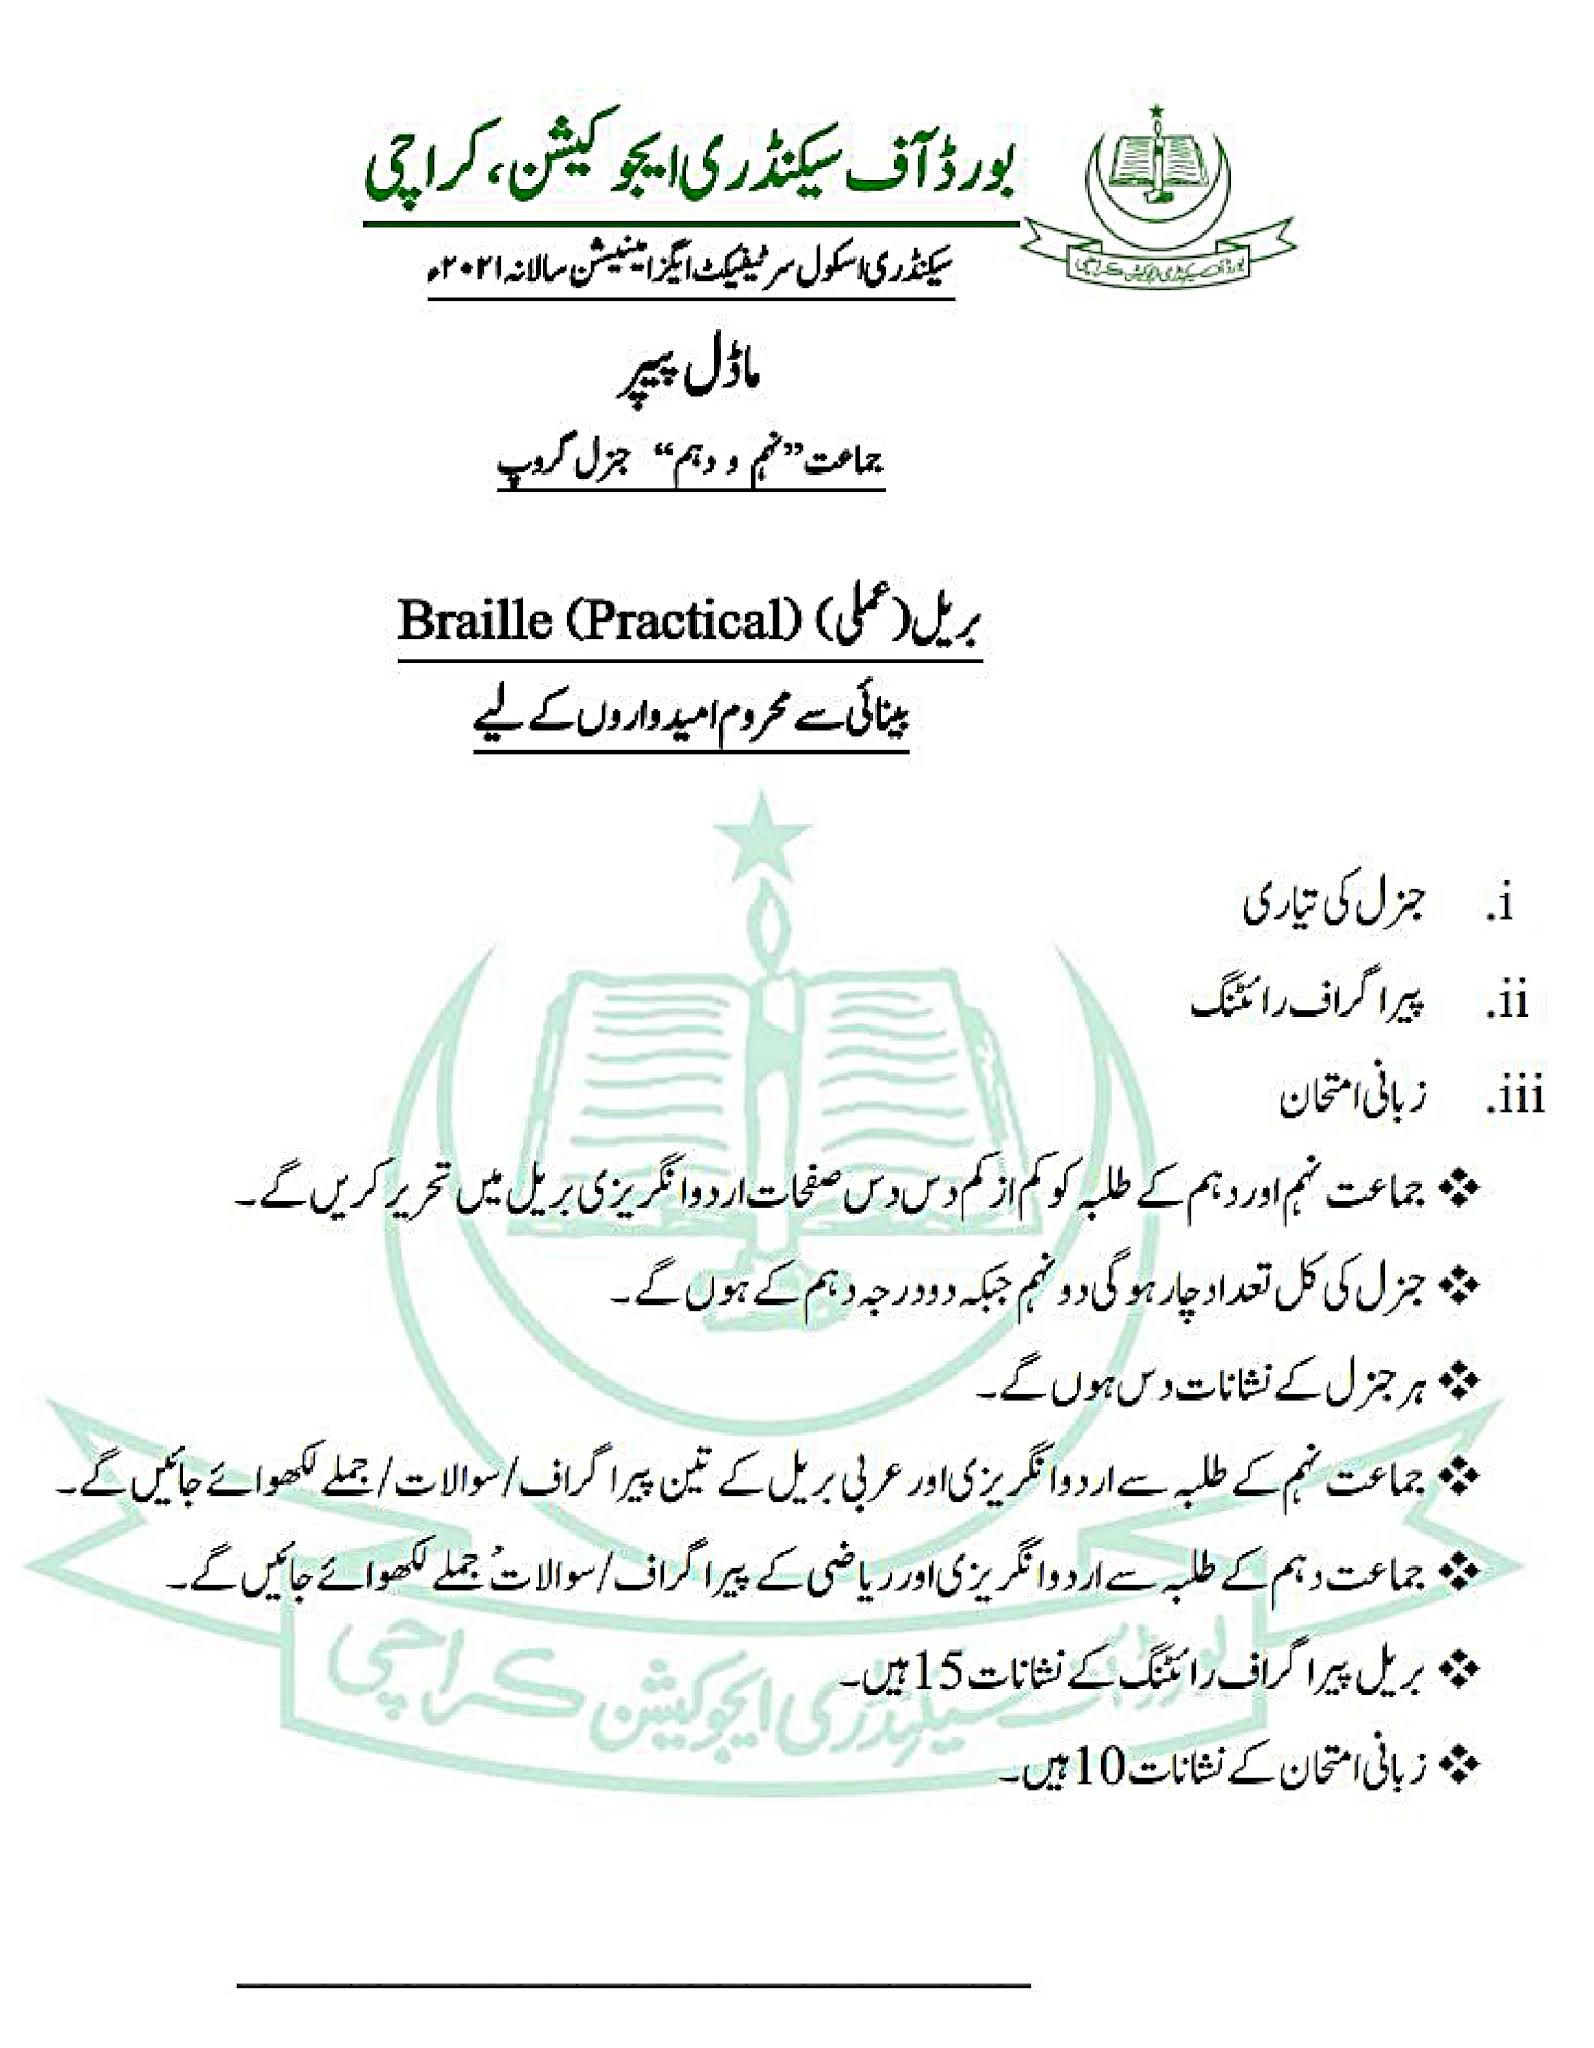
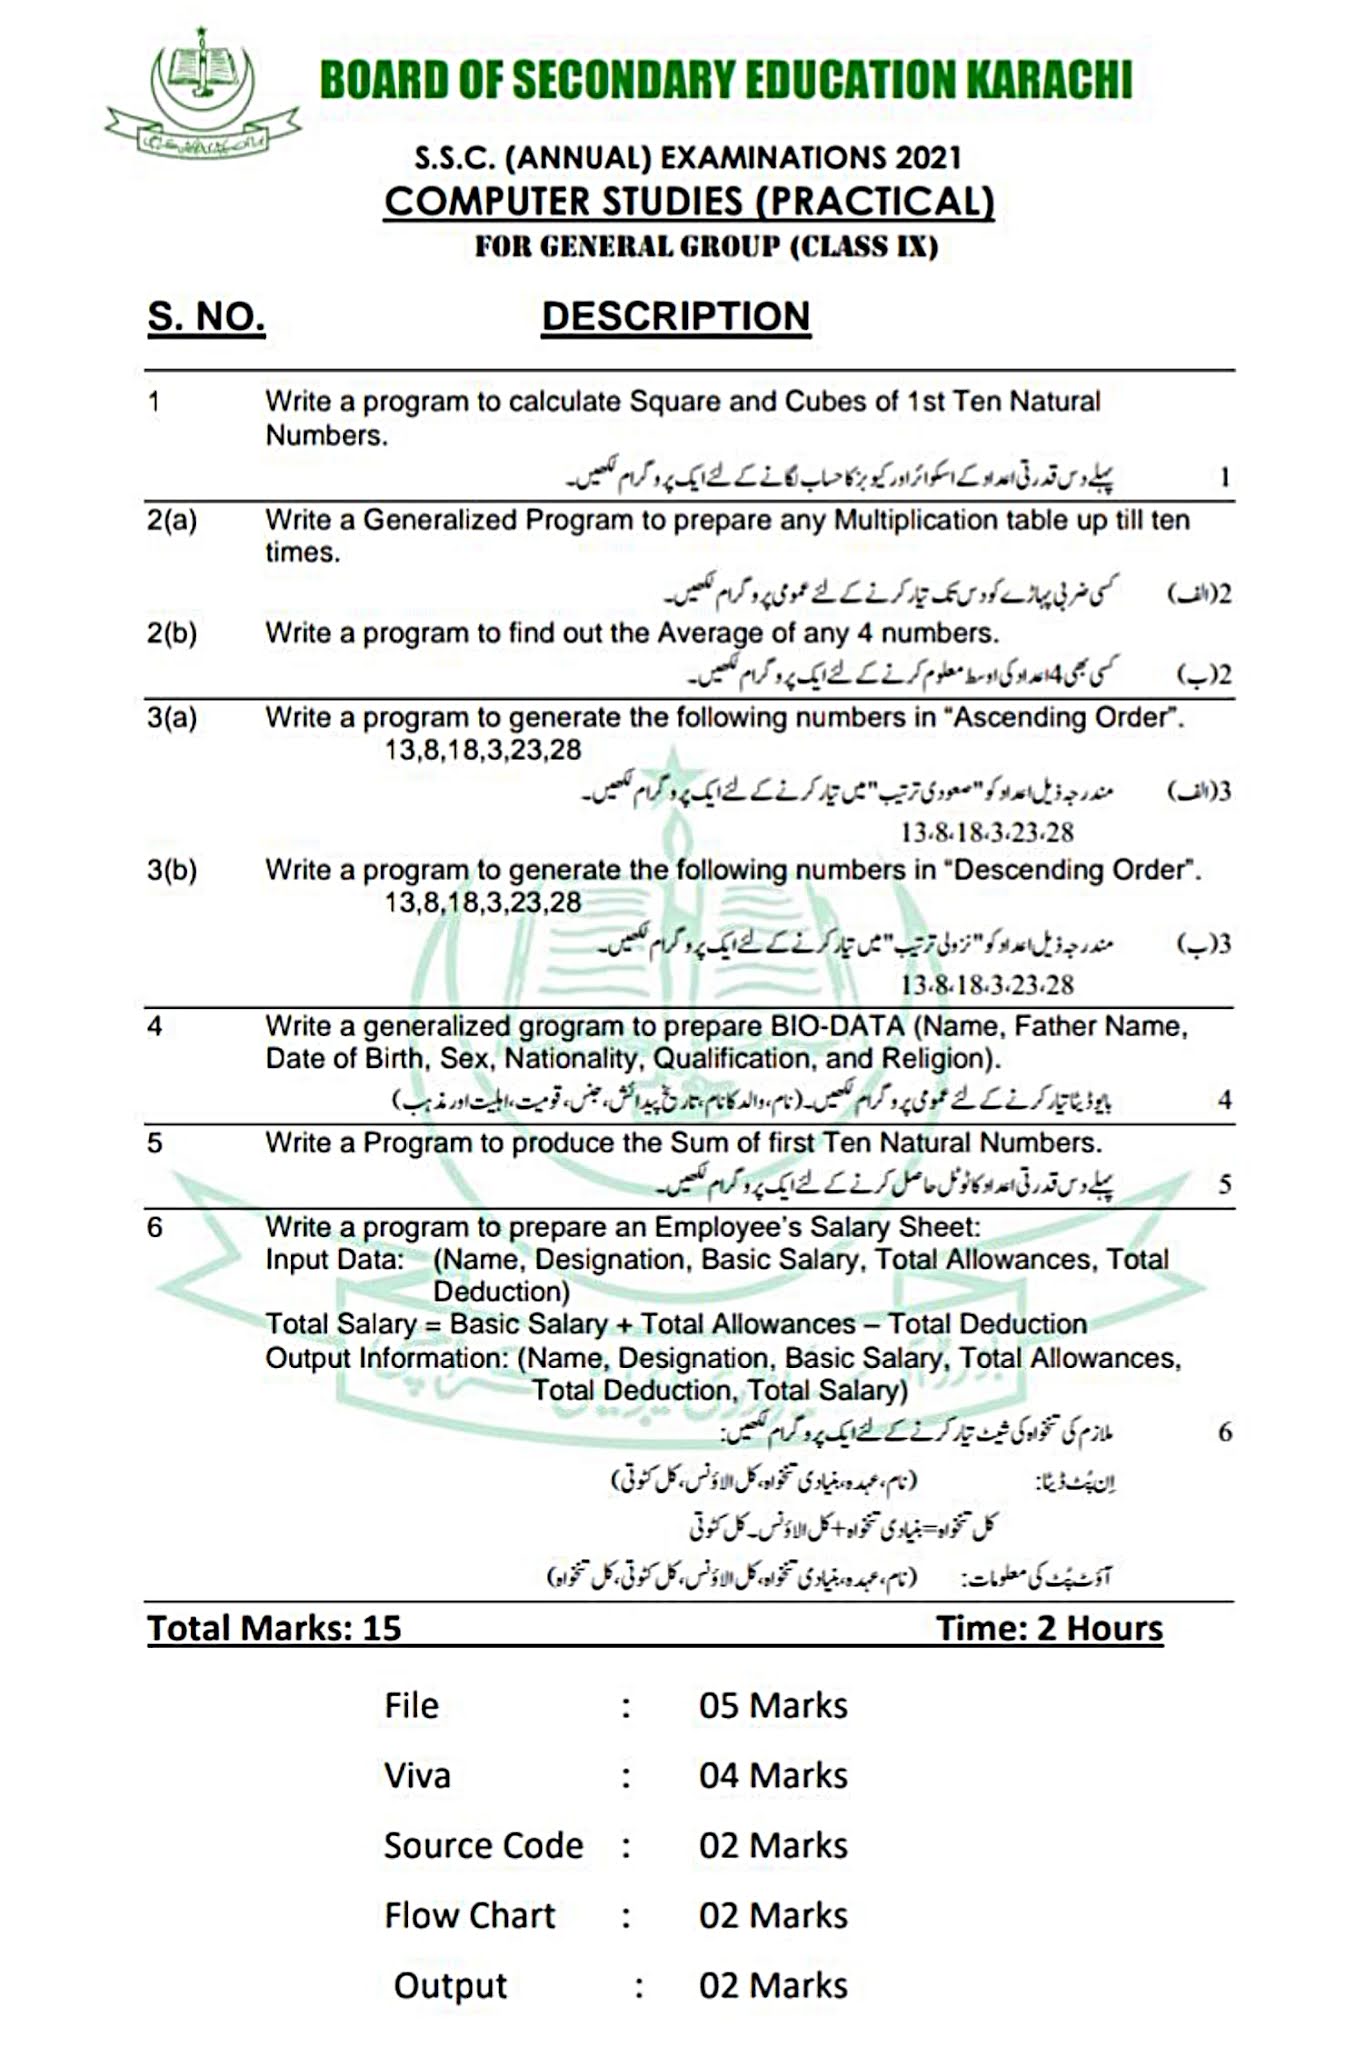
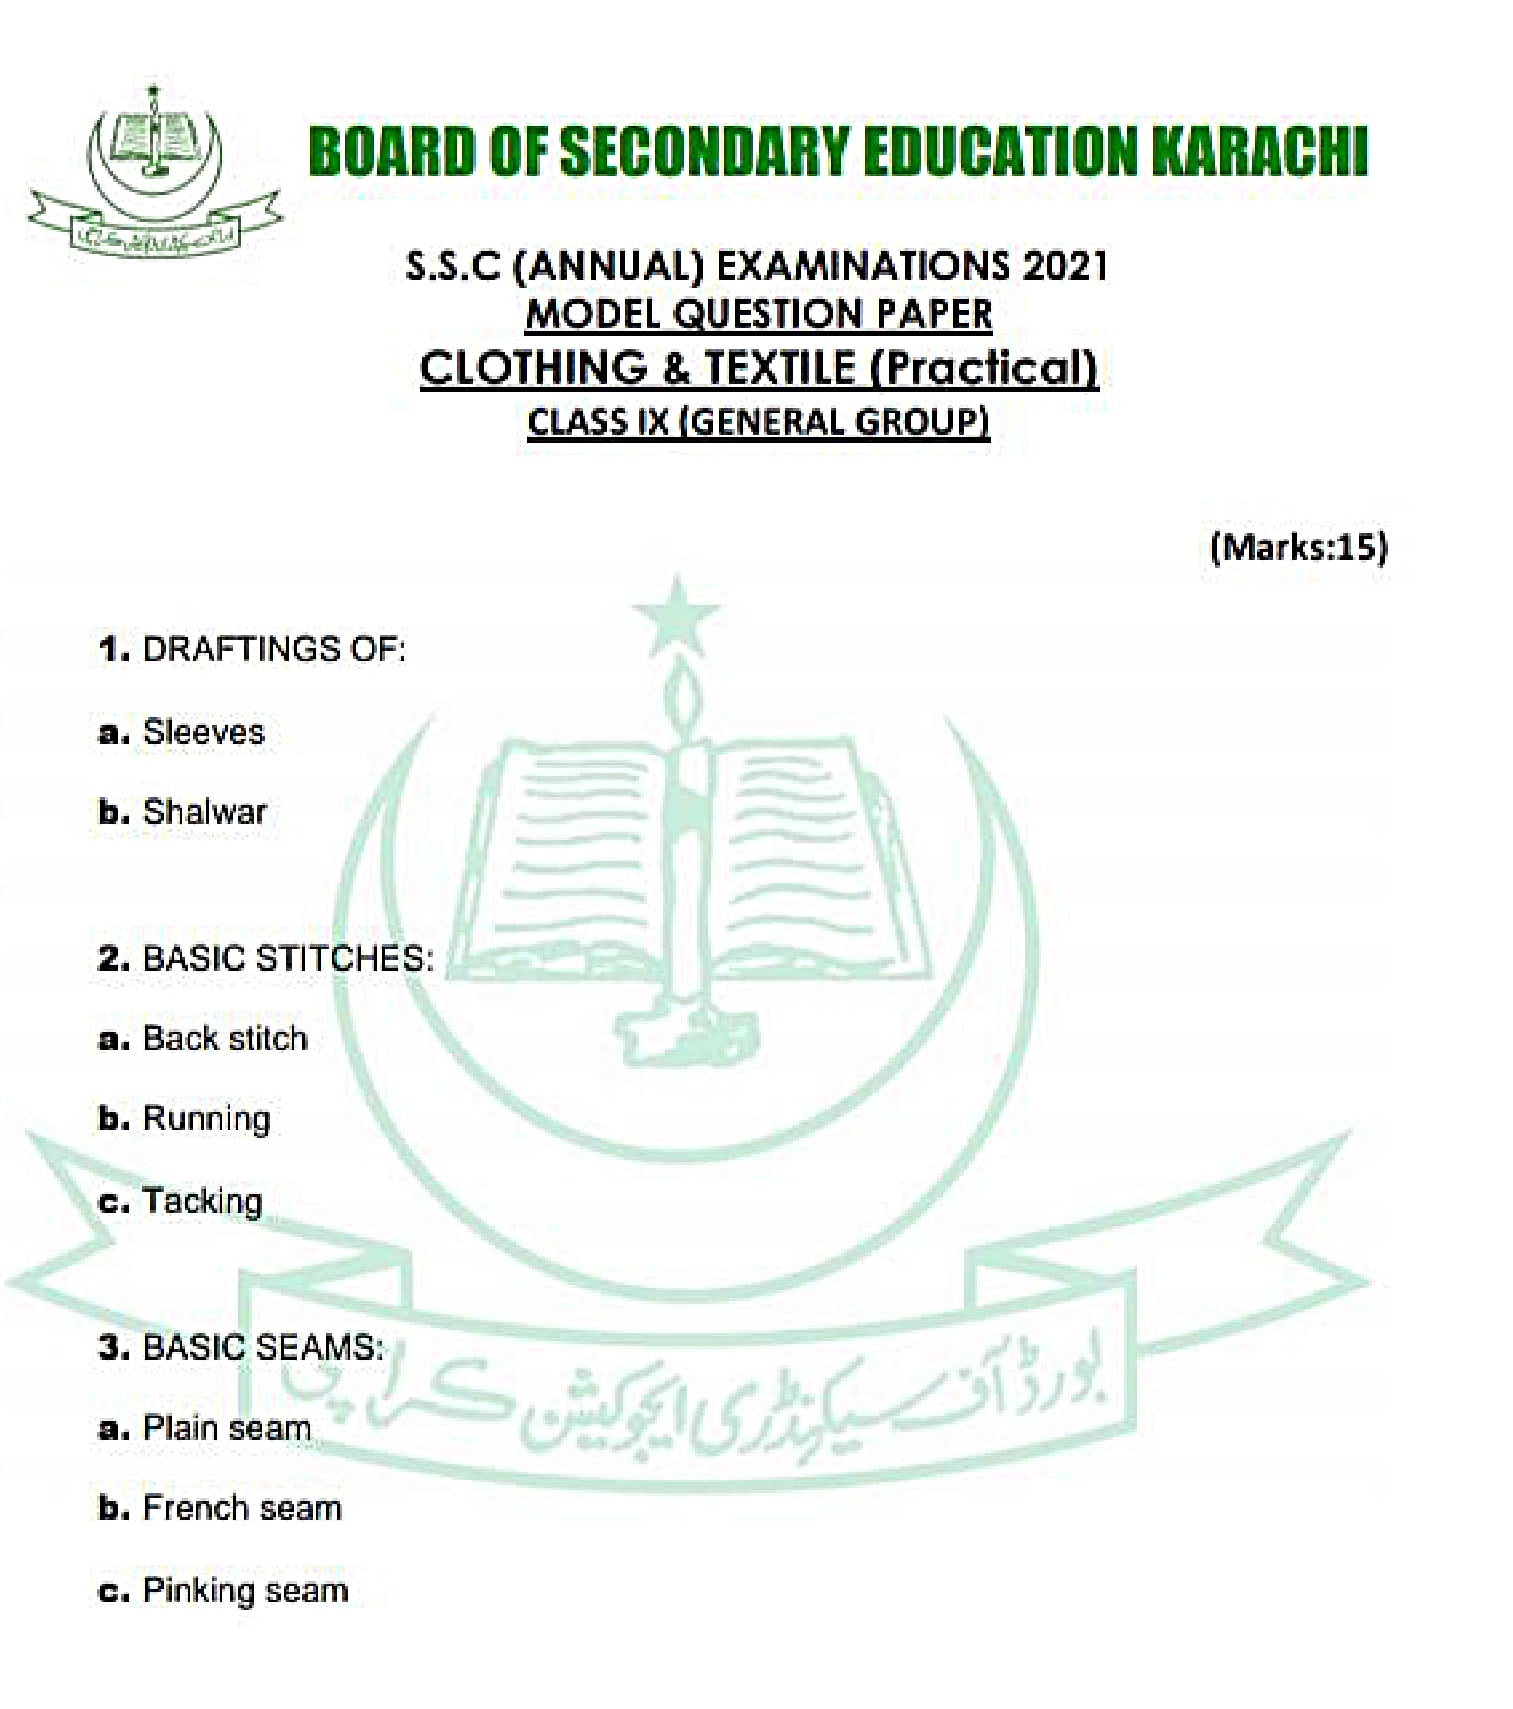
Search This Blog

Friday 23 July 2021

Chemistry Practicals For Class IX (Science Group) - Experiment No. 5: To prepare the standard solution of Oxalic acid

Go To Index


EXPERIMENT NO.5
TO PREPARE THE STANDARD SOLUTION OF OXALIC ACID


APPARATUS:
  • Measuring flask
  • Filter paper
  • Funnel
  • Beaker
  • Glass rod
  • Pipette
  • Physical balance
  • Weight box

CHEMICALS:
  • Oxalic acid (COOH)2.2H2O
  • Distilled water

THEORY:

CONCENTRATION:
The amount of solute present in definite volume of solution is called concentration of a solution.

MOLARITY:
It is defined as, the number of moles of solute dissolved per litter or per cubic decimetre of solution. lt is denoted by "M".

FORMULA OF MOLARITY:
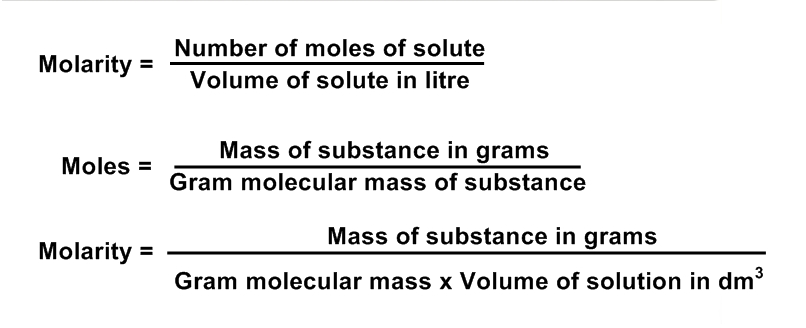

FORMULA OF MASS:
1. Mass of substance = Molarity x gram mol mass x volume in dm3
2. Mass of substance = Molarity x gram molecular mass x volume in cm3 / 1000

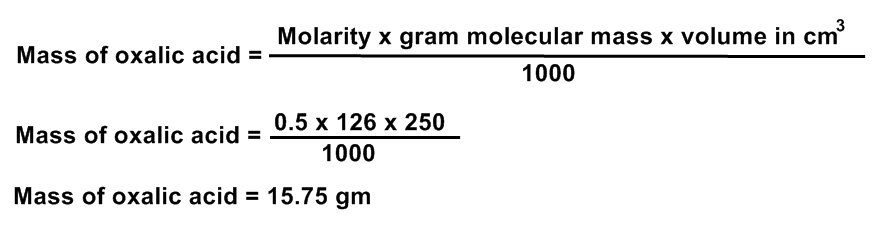
CALCULATIONS FOR 0.5 M SOLUTION OF OXALIC ACID

1. MOLECULAR FORMULA OF OXALIC ACID
(COOH)2.2H2O

2. CALCULATION OF MOLECULAR MASS OF OXALIC ACID
(COOH)2.2H2O
= (12 + 16 + 16 + 1)2 + 2 (2 + 16)
= ( 24 + 32 + 32 + 2) + 2(18)
= 90 + 36
= 126 gm

3. MASS OF OXALIC ACID REQUIRED FOR 100 ML


4. MASS OF OXALIC ACID REQUIRED FOR 250 ML


METHOD:
  • Adjust physical balance.
  • Place filter paper in left hand pan.
  • With the help of forceps place standard weights of weight box in right hand pan, till the pointer oscillates equally about centre zero, when the centre rod is raised.
  • Record mass of filter paper.
  • Now place the weighed filter paper in right hand side pan and weights in left hand side pan.
  • Place additional weights (6.3 gm for 100 ml or 15.75 gm for 250 ml in left hand pan.
  • Put oxalic acid in right hand pan equivalent to the weights (6.3 gm or 15.75 gm).
  • Transfer weighed oxalic acid into a beaker and dissolve it in a minimum quantity distilled water by stirring with a glass rod.
  • Take a 100 ml flask for 6.3 gm or 250 ml flask for 15.75 gm oxalic acid.
  • Transfer the solution from beaker into the flask.
  • Wash the beaker and transfer the weighing to the flask.
  • Add more water into the flask till the level of solution reaches very close to mark on the neck.
  • Now continuously add water with the help of pipette, dropper or wash bottle till the lower meniscus touches the required mark.
  • This is 0.5 M solution of oxalic acid.

PRECAUTIONS:
  • Physical balance must be adjusted.
  • Air bubbles must be removed.
  • The weighing should be accurate.
  • The beaker should be washed and washing should be added to the solution of flask.
  • Final addition of water should be cautiously done.
  • Lower meniscus A solution should be read.


Special Thanks to Sir Sajjad Akber Chandio


Chemistry Practicals For Class IX (Science Group) - Experiment No. 4: To purify the given sample of Copper Silphate by crystallization.

Go To Index


EXPERIMENT NO. 4
TO PURIFY THE GIVEN SAMPLE OF COPPER SULPHATE BY CRYSTALLIZATION.

APPARATUS:
  • Beaker
  • Funnel
  • Glass rod
  • Watch glass
  • Tripod stand
  • Wire gauze
  • Bunsen burner (Spirit lamp)
  • Filter paper
  • Iron stand
  • Stirrer

CHEMICALS:
  • Impure copper sulphate and distilled water.

CHEMICAL EQUATION:
CuSO4 + 5H2O ⇒ CuSO4.5H2O
Anhydrous (white)    Penta hydrated (blue)

THEORY:
A solution that cannot dissolve more solute is called saturated solution. If saturated solution is further heated and more solute is added, it dissolves. Now on cooling slowly, at roorn temperature, crystals of pure compound obtained, while impurities remain in solution.

METHOD:
  • Take about 40 ml distilled water in the beaker.
  • Add small quantity of pulverized impure copper sulphate into the beaker containing water.
  • Stir it with glass rod to dissolve it.
  • Keep on stirring until whole salt dissolve it.
  • Keep on adding and stirring until the time will come when no more salt would be dissolved.
  • Pour the solution through filter paper to remove insoluble impurities.
  • Now decant the solution into another beaker to separate it from undissolved salt.
  • Concentrate the solution by boiling the solution until the volume becomes half.
  • Allow the solution to cool at room temperature.
  • Decant off supernatant liquid.
  • Dry the crystals in a fold of filter paper.

RESULT:
Pure crystals of copper sulphate are obtained.

PRECAUTIONS:
  • Saturated solution should be prepared at room temperature.
  • Cooling process should be as slow as possible.
  • During cooling don't disturb the beaker.


Special Thanks to Sir Sajjad Akber Chandio


Chemistry Practicals For Class IX (Science Group) - Experiment No. 2: To determine the melting point of a given solid

Go To Index


EXPERIMENT 2
TO DETERMINE THE MELTING POINT OF A GIVEN SOLID.

APPARATUS:
  • Thermometer
  • Beaker
  • Test tube
  • Rubber band
  • Stirrer
  • Tripod stand
  • Iron stand
  • Wire gauze
  • Spirit lamp (Bunsen burner)

CHEMICALS:
  • Candle wax (using urea, stearic acid and acetamide Or any other solid)
  • Water

THEORY:
The temperature at which a solid becomes a liquid at standard atmospheric Pressure is called melting point.
OR
The temperature at which a solid and its liquid are in equilibrium, at any fixed pressure is called melting point.
OR
The melting point of a solid is the temperature at which it changes state from solid to liquid.
The melting is a physical property of a substance. It is the temperature at which the crystals of a pure substance are in equilibrium with the liquid phase at atmospheric pressure.
A pure solid will generally melt sharply because the forces of attraction between its particles are the same. An impure solid melts at a lower temperature and over a wider range. Thus, a solid's melting point is useful not only as an aid in identification but also as an indication of purity.

1st. METHOD:
  • Fill one quarter of test tube with candle wax.
  • Tie it to a thermometer in such a way that the wax portion is close to the thermometer bulb. Suspend the thermometer onto the clamp.
  • Take some water in a beaker.
  • Put the beaker on a wire gauze, over a tripod stand.
  • Lower the thermometer along with the test tube by adjusting the clamp.
  • Fix the clamp on iron stand.
  • The bulb of thermometer should be dipped in the water.
  • Heat the beaker slowly by means of Bunsen burner with constant stirring the water with stirrer.
  • Note the temperature when 3/4th of wax melted.
  • Stop heating and note the temperature of wax when it starts freezing.
  • Find average of both temperatures.

2nd. METHOD:
  • Fill one quarter of test tube with candle wax.
  • Clamp the test tube with iron stand and put it into the beaker which is already placed on a tripod stand and filled with water such that candle wax remains in water.
  • Now clamp a thermometer with an iron stand and dip it into the candle wax in such a way that its bulb remains in candle wax.
  • Heat the beaker slowly by means of Bunsen burner with constant stirring the water with stirrer.
  • Note the temperature when 3/4th of wax melted.
  • Stop heating and note the temperature of wax when it starts freezing.
  • Find average of both temperatures.

OBSERVATIONS:
INITIAL TEMPERATUREFINAL TEMPERATUREMEAN TEMPERATURE
Temperature at which wax starts meltingTemperature at which liquid wax starts freezingMelting point
t = t1 + t2/2

_____ °C


_____ °C


_____ °C


RESULT:
Melting point of given candle wax is ___________ °C.

NOTE: Repeat the experiment by using urea, stearic acid and acetamide or any other solid and record their melting points.


PRECAUTION:
  • Water should be heated gently.
  • Stirring should be constant.
  • Thermometer bulb should not touch the walls and base of the beaker.
  • Too much or too little sample can be a cause of error.
  • Adjust flame size so that the temperature rises no more than 2-3 degree per minute.
  • A sample is only used once for melting point determination.
  • The graduated side of thermometer should face you.

Special Thanks to Sir Sajjad Akber Chandio


Chemistry Practicals For Class IX (Science Group) - Experiment No. 3: To determine the boiling point of a given liquid.

Go To Index


EXPERIMENT NO.3:
TO DETERMINE THE BOILING POINT Of A GIVEN LIQUID

APPARATUS:
  • Beaker
  • Thermometer
  • Test tube
  • Capillary tube
  • Tripod stand
  • Wire gauze
  • Spirit lamp (Bunsen burner)
  • Stirrer
  • Rubber band

CHEMICALS:
  • Ethyl Alcohol (carbon tetra-chloride and paraffin liquid or any given liquid)
  • Water

THEORY:
Temperature A which the vapour pressure of liquid becomes equal to the atmosphere pressure is called boiling point.
The boiling point is a physical property of a substance. It can be defined in terms of the vapour pressure of the solvent. It is the temperature at which the vapour pressure of the liquid Of solvent in a solution is equal to external pressure (i.e. atmospheric pressure). This means liquids can boil at almost any temperature if the external pressure is adjusted. When the pressure on a liquid is increased the boiling point goes up, and if the pressure on a liquid is reduced so it lowers the boiling point. Boiling point is also a characteristic constant, a pure liquid boils at a higher temperature whether the liquid contains a non-volatile or volatile impurities.

1st. METHOD:
  • Seal a small capillary glass tube at one end.
  • Take a small quantity (2 ml) of ethyl alcohol in a small test tube.
  • Insert the sealed capillary tube upside down into the small test tube, inside the ethyl alcohol.
  • Tie the small test tube with a thermometer in such a way that its lower encl remain near the bulb.
  • Suspend the thermometer on a clamp.
  • Take it beaker half filled with water and place it over a wire gauze which is placed over a tripod stand.
  • Lower the thermometer along with the small test tube into the water without touching the wall base by adjusting the clamp on the stand.
  • Fix the clamp.
  • Now slowly heat the beaker with a Bunsen burner or spirit lamp with constant stirring the water.
  • When bubbles come out rapidly from the lower end of capillary tube, the temperature on thermometer is noted.
  • Stop heating by removing the burner or spirit lamp.

2nd. METHOD:
  • Seal a small capillary glass tube at one end.
  • Take a small quantity (2 ml.) of ethyl alcohol in a small test tube.
  • Insert the sealed capillary tube upside down into the test tube, inside the ethyl alcohol.
  • Clamp the test tube with iron stand and put it into the beaker which contains water and placed on a tripod stand such that ethyl alcohol remain In water.
  • Now clamp a thermometer with an iron stand and dip it into the ethyl alcohol in such a way that its bulb remain in ethyl alcohol.
  • Now slowly heat the beaker with a Bunsen burner or spirit lamp with constant stirring the water.
  • When bubbles come out rapidly from the lower end of capillary tube, the temperature on thermometer is noted.
  • Stop heating by removing the burner or spirit lamp.

OBSERVATIONS:
Boiling point of ethyl alcohol is 78 °C.

RESULT:
Boiling point of given sample of ethyl alcohol (C2H5OH) is 78 °C.

PRECAUTIONS:
  • Water should be heated gently.
  • Stirring should be constant.
  • Bulb of thermometer should not touch the walls and base of the beaker.
  • Too much or too little sample can be a cause of error.
  • Adjust flame size so that the temperature rises no more than 2-3 degree per minute.
  • A sample is only used once for boiling point determination.
  • The graduated side of thermometer should face you.


Note: Result may be vary depending on the purification of ethyl alcohol.
Special Thanks to Sir Sajjad Akber Chandio

Thursday 22 July 2021

Chemistry Practicals For Class IX (Science Group) - Experiment No. 1: To cut and bend a glass tube and draw a Jet.

Go To Index


EXPERIMENT NO. 1
TO CUT AND BEND A GLASS TUBE AND DRAW A JET

APPARATUS:
  • Glass Tube
  • Small Triangular file
  • Knife
  • Match Box
  • Meter stick
  • Glass marking pencil
  • Bunsen burner / Spirit lamp

CUTTING OF A GLASS TUBE
METHOD:
  • Place a glass tube horizontally on a table (or any solid support) as given in the figure.
  • Measure the desired length by the meter stick.
  • Mark the length with a glass marking pencil.
  • Make a single sharp transverse scratch with a triangle file at the mark.
  • Hold the tube with both hands in a way that thumbs remain below (opposite to) the mark.
  • Exert a little force to break the tube into two pieces with a quick jerk.
  • Keep the tube away from your face.
  • The tube breaks evenly at the scratched place.
  • Round the rough edges of cut tubes by rotating in flame (fire-glazing).
  • Allow the tube to cool by placing it over an asbestos sheet.


BENDING OF A GLASS TUBE
METHOD:
  • Hold a tube horizontally in your both hands over a Bunsen flame at the ptace where it is to be bent as shown in the figure.
  • By rolling and moving the tube back and forth, heat the 2 inches part of the tube evenly, that has to be bent.
  • Keep it rotating until it softens.
  • When glass becomes soft.
  • Bend it at the desired angle, keeping it a bit up from the tip of the flame.
  • Hold until the glass hardens.


MAKING OUT A JET
METHOD:
  • Hold the tube in your both hands as given in the figure.
  • Put it over the flame in a way that only one and half inch of the tube remains in the flame.
  • Slowly rotate the tube about its axis, keeping it in the flame until it softens.
  • When soft, remove it from the flame and immediately draw the two ends apart carefully till it forms a fine capillary of desired diameter.
  • After cooling, cut the tube to separate the two ends by means of a knife.
  • Round the rough edges of cut tubes by rotating in flame (fire-glazing).
  • Each piece of the tube has a jet.


PRECAUTIONS:
  • The scratch on the tubes should be sufficiently deep.
  • Pressing of thumbs should be with a uniform force.
  • Avoid too much heating, it may cause poor bends.
  • The tube should be continuously rotated while heating.
  • Do not keep the hot tube on the table.
  • Pull the ends of the tube by taking it out of the flame.
  • Heat the tube in the upper portion of the flame and continue rotating.
  • While drawing a jet the pulling apart of the glass tube should be immediate and carefully.
  • Never try to break the tube with simple bare hands.


Special Thanks to Sir Sajjad Akber Chandio


Monday 19 July 2021

Physics - Practicals Model Papers 2021 For Class X -Science Group

Physics
Practicals Model Papers 2021
For Class X -Science Group


Physics Practical Model Paper 2021


Computer Studies, Arts and Model Drawing, Clothing And Textile, Food And Nutrition And Braille Practicals Model Papers For Class X -Arts / Humanities Or General Group

Computer Studies, Arts and Model Drawing, Clothing And Textile, Food And Nutrition And Braille
Practicals Model Papers
For Class X -Arts / Humanities Or General Group


Arts and Model Drawing Practical Model Paper 2021


Clothing And Textile Practical Model Paper 2021


Computer Studies Practical Model Paper 2021


Food And Nutrition Practical Model Paper 2021


Braille Practical Model Paper 2021


Computer Studies, Arts and Model Drawing, Clothing And Textile, Food And Nutrition And Braille Practicals Model Papers For Class IX -Arts / Humanities Or General Group

Computer Studies, Arts and Model Drawing, Clothing And Textile, Food And Nutrition And Braille
Practicals Model Papers
For Class IX -Arts / Humanities Or General Group


Computer Studies Practical Model Paper 2021


Arts and Model Drawing Practical Model Paper 2021


Braille Practical Model Paper 2021


Clothing And Textile Practical Model Paper 2021


Food And Nutrition Practical Model Paper 2021


Biology, Chemistry, Computer Studies And Physics - Practicals Model Papers For Class IX -Science Group

Biology, Computer Studies, Chemistry And Physics
Practicals Model Papers
For Class IX -Science Group


Biology Practical Model Paper 2021


Chemistry Practical Model Paper 2021


Computer Studies Practical Model Paper 2021


Physics Practical Model Paper 2021