Search This Blog

Showing posts with label Computer Practicals IX. Show all posts

Monday, 17 January 2022

To create table in html.

GO TO INDEX

Computer Practicals For Class IX
Activity No.10


PRACTICAL NO. 10:
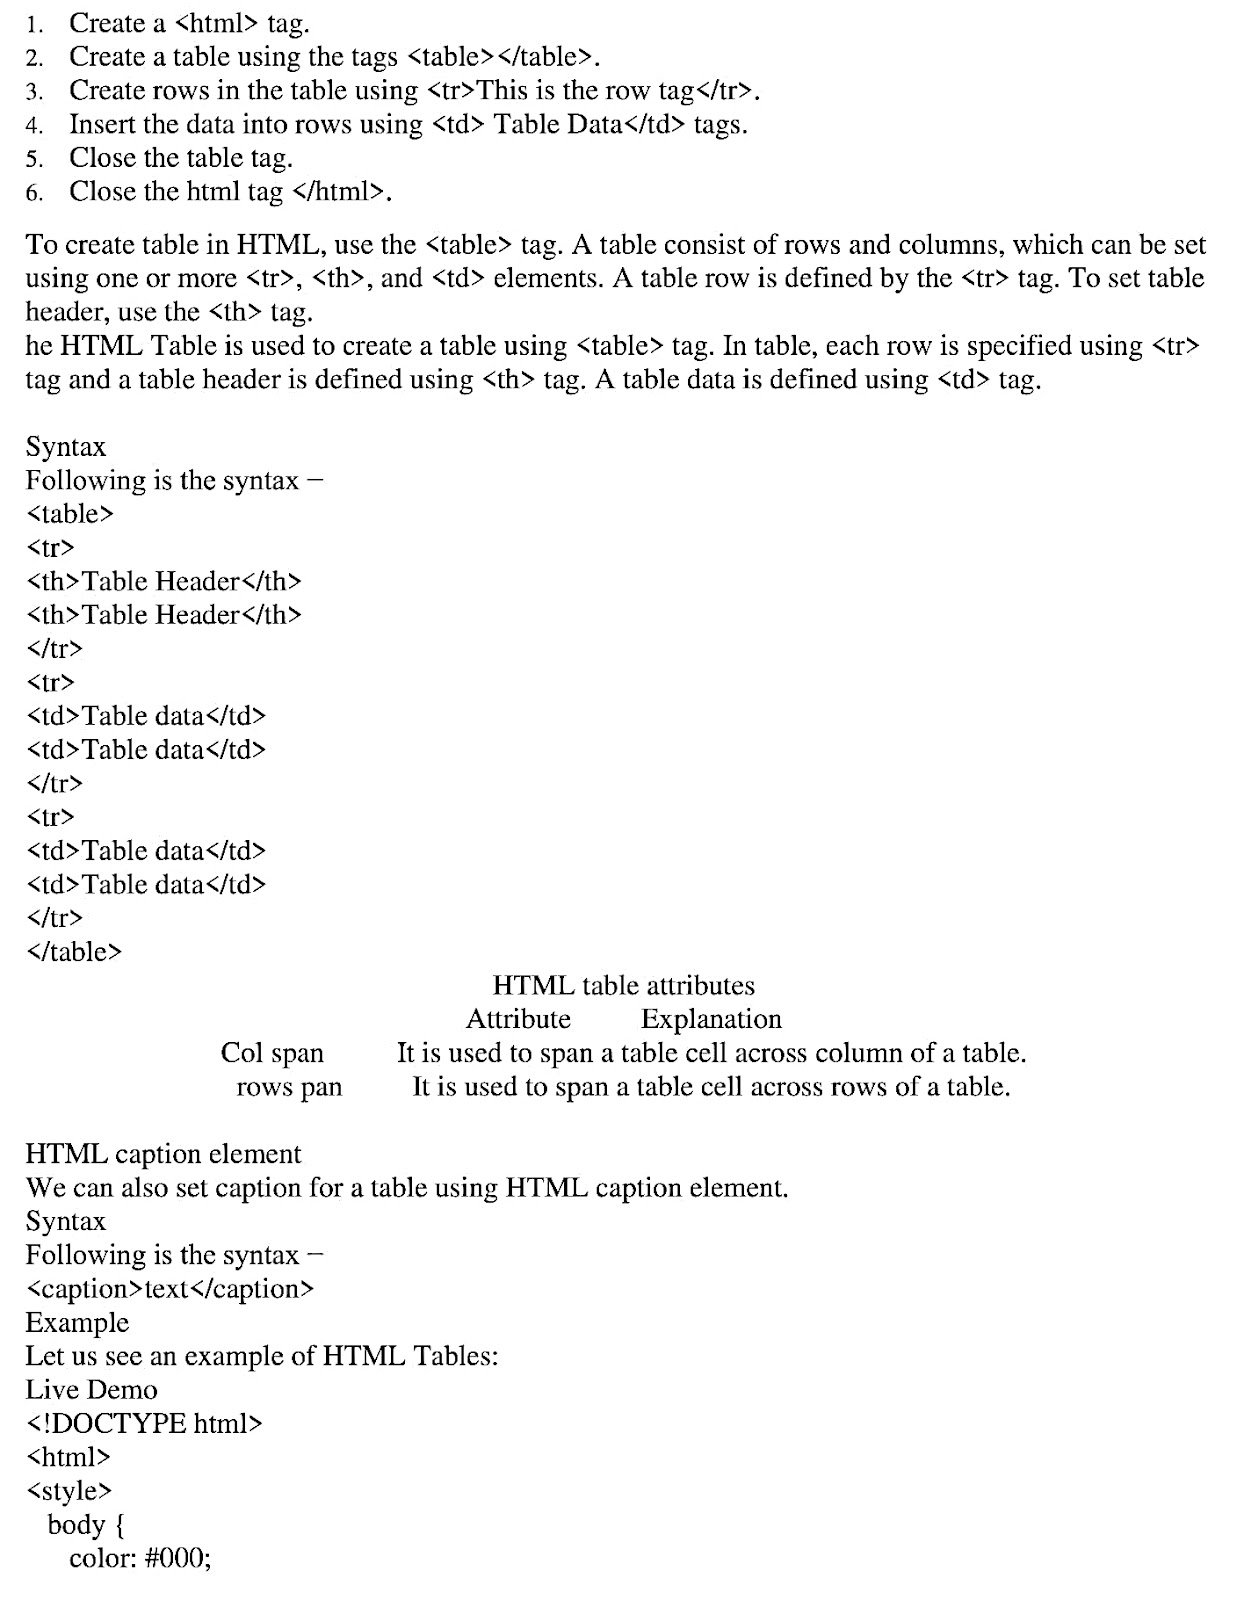
TO CREATE A TABLE IN HTML


USE THE FOLLOWING STEPS


By Miss Shabana Sheikh And
By Sir Sajjad Akber chandio


Correction of above table

HTML table attributes
Attribute Explanation
colspan It is used to span a table cell across column of a table.
rowspan It is used to span a table cell across rows of a table.

  • * span means merge (columns or rows)
  • *height: 100vh; means the height of this element is equal to 100% of the viewport height.
  • *"color: #000;" means hex values (RGB value) of color, such as:
    #000; represent Black color.
    #fff; represent white color.
    #ff0000; represents red color etc.

Practical No.9: To create a website.

GO TO INDEX

Computer Practicals For Class IX
Activity No.9


PRACTICAL NO. 9:
TO CREATE A WEB SITE


USE THE FOLLOWING STEPS
9 steps to create your first HTML webpage
Step 1: Open a text/ html editor
Remember the text editor I talked about earlier on, time to open and use it. If you have used one.
before, skip to the next section. If you don’t know how, the instructions below will help you depending on the kind of computer you use.
  • How to open a text editor on a Ubuntu [YouTube]
  • How to open a text editor on a Window computer [YouTube]
  • How to open a text editor on a Mac [YouTube]
After opening the text editor of your choice, create a new file. Then, you can proceed to the next step.
Advertisement


By Miss Shabana Sheikh And
By Sie Sajjad Akber Chandio


Practical No.8: Apply Formulas of Ms Excel.

GO TO INDEX

Computer Practicals For Class IX
Activity No.8


PRACTICAL NO. 8:
APPLING FORMULA IN MS EXCEL


USE THE FORMULAS AND FUNCTIONS STEPS
Enter a Formula | Edit a Formula | Operator Precedence | Copy/Paste a Formula | Insert Function

A formula is an expression which calculates the value of a cell. Functions are predefined formulas and are already available in Excel.

For example, ADDITION
=A1+A2+A3

For example, SUM
=SUM(A1:A3)

For example, SUM
=SUM(A1:A3)

Enter a Formula
To enter a formula, execute the following steps.
  1. Select a cell.
  2. To let Excel know that you want to enter a formula, type an equal sign (=).
  3. For example,
    type the formula A1+A2. (Instead of typing A1 and A2, simply select cell A1 and cell A2.
  4. Change the value of cell A1 to 3.
    Excel automatically recalculates the value of cell A3. This is one of Excel's most powerful features!

Edit a Formula
When you select a cell, Excel shows the value or formula of the cell in the formula bar.
  1. To edit a formula, click in the formula bar and change the formula.
  2. Press Enter.

OPERATOR PRECEDENCE
Excel uses a default order in which calculations occur. If a part of the formula is in parentheses, that part will be calculated first. It then performs multiplication or division calculations. Once this is complete, Excel will add and subtract the remainder of your formula.

For example, SUM
=A1*A2*A3
First, Excel performs multiplication (A1 * A2). Next, Excel adds the value of cell A3 to this result.

Another example,
=A1*(A2+A3)
First, Excel calculates the part in parentheses (A2+A3). Next, it multiplies this result by the value of cell A1.

To insert a function, execute the following steps.
  1. Select a cell.
  2. Click the Insert Function button.
    The 'Insert Function' dialog box appears.
  3. Search for a function or select a function from a category. For example, choose COUNTIF from the Statistical category.
  4. Click OK. The 'Function Arguments' dialog box appears.
  5. Click in the Range box and select the range A1:C2.
  6. Click in the Criteria box and type >5.
  7. Click OK.
Result. The COUNTIF function counts the number of cells that are greater than 5.
Note: instead of using the Insert Function feature, simply type =COUNTIF (A1:C2,">5"). When you arrive at:
=COUNTIF (instead of typing A1:C2, simply select the range A1:C2.


By Miss Shabana Sheikh And
By Sir Sajjad Akber Chandio


Practical No.7: To create a marks sheets of ten students.

GO TO INDEX

Computer Practicals For Class IX
Activity No.7


PRACTICAL NO. 7:
TO CREATE A MARKSHEET OF TEN STUDENTS


USE THE FOLLOWING STEPS
1. Marksheet Format in Excel:
That is why the management of schools uses MS Excel to maintain data of students. In the excel mark sheet, we have to manipulate the marks of students in various ways to evaluate their performance and give the result.

2. Start “MS Excel” program.

3. Fill your data by these information “SNO”, “Name”, “F/Name”, “English”, “Chemistry”, “Mathematics”, “Physics”, “Biology”, “Drawing”, “History”, “Total Marks”, “Marks Obtained”, “Minimum no”, “Maximum no”, “Average”, and “Grade”.

4. For example, if you type the formula =10/100 in cell A2, Excel will display the result as 0.1. If you then format that decimal as a percentage, the number will be displayed as 10%, as you 'd expect.

5. Type = 5 + 2 * 3 in another cell and press Enter or Return. Excel multiplies the last two numbers and adds the first number to the result.
Data 5
Formula Description Result
=A2+A3 Adds the values in cells A1 and A2 =A2+A3
=A2-A3 Subtracts the value in cell A2 from the value in A1 =A2-A3

6. So for each cell (in the Total column) we will enter =SUM(Grade Cell * Weight Cell), so my first formula is =SUM(B2*C2), the next one would be =SUM(B3*C3) and so on.

7. To insert a check mark symbol in Excel, simply press SHIFT + P and use the Wingdings 2 font. You can also insert a checkbox in Excel.

8. As an example, to add 10 to each cell, enter "10" (without the quotation marks here and throughout).
To increase the values by a certain percentage, add 100 to the percentage and enter the number with the percent sign, such as "150%" to add a 50 percent profit margin.

9. The percentage formula in Excel is = Numerator/Denominator (used without multiplication by 100). To convert the output to a percentage, either press “Ctrl + Shift + %” or click “%” on the Home tab's “number” group. Let us consider a simple example.


By Miss Shabana Sheikh And
By Sir Sajjad Akber Chandio


Practical No.6: To design a birthday card.

GO TO INDEX

Computer Practicals For Class IX
Activity No.6


PRACTICAL NO. 6:
TO DESIGN A BIRTH DAY CARD


USE THE FOLLOWING STEPS
Step 1: Make Up Your Mind on the Content of Your Card:
It is very important that before you start making your card, you should have in mind the type of things you would like to put down in the birthday card. You should sketch the details down on a piece of paper so as not to forget.

Step 2: Open the Microsoft Office 2010 on Your Computer:
After opening the Microsoft Word app in your computer, head to the file section > New > Blank document. After that, go to the page layout section and select orientation and then select landscape.

Step 3: Choose Number Of Columns:
Finally, go to the column section and select the number of columns you would like. Using two columns, you can now include images, any text you would like, and any type of decorations you would like to use on the column that is on the right side (hand) this is what will make up the front of your birthday card. The fact that you are using columns means that even if you fold it after printing it, the birthday card will be nicely lined up.

Step 4: You Ought to Change the Color of Your Background:
Click on the page layout section then click on the page color. The page color consists of many different types of colors that you can choose from. When choosing the right color, always consider the receiver's favorite color and not the color you prefer. You want the card to be perfect so as to make the receiver extremely happy. If you are not sure of the right color, then you necessarily do not have to put a background color. The background color will sometimes use up a lot of your ink, therefore it is not really a must.

Step 5: Add a Border:
At this step, you should go the page layout section and click on page border. Choose any style that is fun and appeals to you in the Art box and it consists of several patterns, different kinds of balloons, stars and even hearts. You should also choose the type of color.

Step 6: Add the Appropriate Text:
Head to Home and select Word Art section- here you can choose the type of text that you would like to use. You can decide on the text color or text size at this step.

Step 7: Add the Clip Art:
If you are using new version like Office 360, 2013 or 16 then unfortunately Microsoft Office no longer provide clip arts. But if you are using 2010 or earlier version then go to Insert and click on Clip Art.
Microsoft Word 2010 consists of many kinds of images you can pick and use. Click on the search section and type the word 'birthday'.

Step 8: Insert Your Own Pictures:
Go to insert and select pictures. You should have the pictures saved somewhere in a folder in your computer. Click on the folder which has the picture and select the one you are planning to use. You can decide to crop your picture or not. After you are satisfied, save the file.

Step 9: Edit Your Card:
You should go through your card just to make sure everything is in order.

Step 10: Print and Save Your Card:
Printing is done just like the way you print a normal power point file and the save it in your computer.


By Miss Shabana Sheikh And
By Sir Sajjad Akber Chandio


Practical No.5: Insert automatic table of content with two headings.

GO TO INDEX

Computer Practicals For Class IX
Activity No.5


PRACTICAL NO. 5:
INSERT AUTOMATIC TABLE CONTENT WITH TWO HEADING


USE THE FOLLOWING STEPS
How do I insert a heading 2 in a Table of Contents?
Image result for INSERT AUTOMATIC TABLE CONTENT WITH TWO HEADING
To create a subheading in your table of contents, create the subheading in your document. Highlight it and click Heading 2 at the top of your screen.
It will be added to your table of contents, nested underneath the appropriate chapter heading.

Click where you want to insert the table of contents – usually near the beginning of a document. Click References > Table of Contents and then choose an Automatic Table of Contents style from the list.

A table of contents in Word is based on the headings in your document.

Create the table of contents
1. Put your cursor where you want to add the table of contents.
2. Go to References > Table of Contents. and choose an automatic style.

Update Table of content
1. If you make changes to your document that affect the table of contents, update the table of contents by right-clicking the table of contents and choosing Update Field.
To update your table of contents manually, see Update a table of contents.
If you have missing entries.

Missing entries often happen because headings aren't formatted as headings.
1. For each heading that you want in the table of contents, select the heading text.
2. Go to Home > Styles, and then choose Heading 1.
3. Update your table of contents.
To update your table of contents manually, see Update a table of contents.


By Miss Shabana Sheikh And
By Sir Sajjad Akber Chandio


Practical No.4: To write a leave application to a teacher.

GO TO INDEX

Computer Practicals For Class IX
Activity No.4


PRACTICAL NO. 4:
TO WRITE LEAVE APPLICATION TO CLASS TEACHER


USE THE FOLLOWING STEPS
In the subject line of the email put the reason, (Leave of Absence Request, Request for Leave of Absence) followed by
  • Your full name.
  • Explain the leave of absence request.
  • Include a closing.
  • Include your name.

Respected Sir/ Madam, I am (your name), studying in your school in class (class and section). This letter is to inform you that I had to take a leave from my classes on (dates of leave) due to unexpected fever. I hereby request you to consider my absence as leave.

What to include in a leave application for office?
Salutation.
Purpose of the application (subject)
Reason for leave.
Number of leaves needed (particular dates)
Work plan during your absence.
Contact information.
Signature.

Subject: Sick leave application

Dear Mr./Mrs. {Teacher’s Name},

I am writing to notify you that I need sick leave from School because of a COVID19 viral infection to me. I caught the infection yesterday evening in marriage party and since then have been feeling very weak.

As per the doctor, I need to take medication for fifteen days (quarantine at home), along with proper rest for at least two week. The letter from the doctor is attached, confirming the need of time to recover from the illness.

Kindly allow me a two week-long leave, until the {date}. Should I require an extended period off, I will let you know as early as possible.

Please feel free to contact me at your convenience, should you have any questions or require clarification concerning the ongoing illness. Thank you for your quick attention to this matter.

Sincerely,
{Your Name}


By Miss Shabana Sheikh And
By Sir Sajjad Akber Chandio


Practical No.3: Installation of Avg antivirus software.

GO TO INDEX

Computer Practicals For Class IX
Activity No.3


PRACTICAL NO. 3:
INSTALLATION OF AVG ANTIVIRUS SOFTWARE


INSTRUCTIONS
  • Click the name of your product to download the installation file: AVG Antivirus.
  • Run the downloaded file to start the installation process.
  • Follow the instructions on your screen.
  • When prompted, enter your AVG license number.
  • Complete the installation and restart your computer.

1. Click the button below to download the AVG Antivirus setup file, and save it to a familiar location on your PC. Downloaded files are saved to your Downloads folder.

DOWNLOAD AVG ANTIVIRUS FOR WINDOWS
2. Right-click the downloaded setup file AVG antivirus setup.exe and select.

Run as administrator from the context menu.
3. If prompted for permission by the User Account Control dialog,
click Yes.
NOTE: If you are unable to authorize installation of AVG Antivirus, refer to the following article for advice:
Managing administrative accounts on your Windows PC

4. Click Install to proceed with default installation,
or
5. click Customize if you want to make changes to the default setup. Additionally, untick the box if you do not want to install AVG Secure Browser.

6. Wait while setup installs AVG Antivirus on your PC.

7. Click Continue.

8. Click the Continue with Antivirus.

9. Click Run first scan to run a comprehensive Smart Scan and immediately check your PC for viruses, malware, bad browser add-ons, and other issues.

AVG Antivirus is now installed, but some components may not fully function until you restart your PC.


By Miss Shabana Sheikh And
By Sir Sajjad Akber Chandio


Practical No.2: Installation of Ms office 2010.

GO TO INDEX

Computer Practicals For Class IX
Activity No.2


PRACTICAL NO. 2:
INSTALLATION OF MS OFFICE 2010

INSTALL OFFICE 2010
Insert the Office 2010 disc into the drive When prompted, enter the product key. Read and accept the Microsoft Software License terms, and then click Continue. Follow the prompts to complete the Install wizard, and after Office installs, click Close.

What is MS Office installation?
Image result for PRACTICAL to in short INSTALLATION OF MS OFFICE 2010. You how to download and install Microsoft Office on your Windows or computer. Microsoft Office is a suite of software that includes Microsoft Word, Excel, PowerPoint, and more.

Steps To Install Ms. Office 2010:
  1. Uninstall any old versions of Office:
    Keeping any older versions of Office installed can cause errors and problems with your files. To remove old installations. Open the Control Panel and select Programs and Features (Windows Vista, 7, 8), or add/Remove Programs (Windows XP). Wait for the list to load and then select your old Office installation. Click the Uninstall/Remove button and wait for the uninstallation process to finish before installing Office 2010.

  2. Insert your Office 2010 DVD:
    Alternatively, open the downloaded Setup file that you received when you purchased Office 2010 online. Either method will follow the same steps.

  3. Enter the Product Key:
    This is the 25-character key found on the packaging that your Office 2010 came in. If you purchased online, the key will be displayed in the order confirmation window.
    You do not need to enter the dashes in between groups of characters.

  4. Accept the License Terms:
    In order to proceed with the installation, you need to check the box indicating that you have read and agree to Microsoft’s terms of use.

  5. Choose your installation:
    Clicking Install Now will install all of the Office products included in the version that you purchased. Office will be installed to your default hard drive (the same that Windows is installed on).
    Choose Customize to specify which products you want to install. For example, if you never use Excel and just need Word, use Customize to disable the Excel installation. You can also use the Customize option to install Office to a different location on your computer.

  6. Wait for installation to complete:
    Once you have chosen your installation options, Office will be automatically installed. The amount of time this takes will vary depending on the version you are installing and the speed of your computer.
    Once Office is finished installing, you can access each of the individual Office programs from the Start menu.

By Miss Shabana Sheikh And
By Sir Sajjad Akber Chandio


Practical No. 1: Create or save new file or document. -

GO TO INDEX

Computer Practicals For Class IX
Activity No.1


PRACTICAL NO. 1:
CREATE AND SAVE NEW FILE OR DOCUMENT

Every Word project you create whether it’s a personal letter, a TV sitcom script, or a thesis in microbiology begins and ends the same way. You start by creating a document, and you end by saving your work.

  • Opening a Word document:
    Once you’ve created some Word documents, this method is fastest of all, since you don’t have to start Word as a separate step. Just open an existing Word document, and Word starts itself.
    Try going to Start → My Recent Documents, and then, from the list of files, choose a Word document. You can also double-click the document’s icon on the desktop or wherever it lives on your PC.

Creating a New Blank Document

Say you want a new blank document, just like the one Word shows you when you start the program. No problem here are the steps:
  1. Choose Office button → New.
    The New Document dialog box appears.
    To open the New Document window. Then click
    “New from existing”


  2. In the upper-left corner of the large
    “Create a new Word document”
    panel, click “Blank document”.


    The New Document box presents a seemingly endless number of options, but don’t panic. The “Blank document” option you want is on the left side of the first line.

  3. At the bottom of the New Document dialog box,
    Click Create.


    The dialog box disappears, and you’re gazing at the blank page of a new Word document.

Saving and Closing Documents

From the earliest days of personal computing, the watchword has been “save early, save often.” So, here are some tips to protect your work from disasters human made and natural.
  • Name and save your document shortly after you first create it. You’ll see the steps to do so later in this section.
  • Get in the habit of doing a quick save with the short key Ctrl+S, when you pause to think. Ctrl+S still works for a quick save too.
  • If you’re leaving your computer for an extended period of time, save and close your document.

Save Documents

Saving by keyboard shortcut:
  • Ctrl+S. If you’re an old hand at Word, this keyboard shortcut may already be burned in your brain. This command quickly saves the document and lets you get back to work.

Saving by menu command:
  • Office button → Save: If you don’t want to use keyboard shortcuts, you can mouse your way to the same place using menus. Like the options above, this command saves your file with its current name.

  • Office button → Save As: The Save As option lets you save your file with a new name. When you use this command, you create a new document with a new name that includes any changes you’ve made.

  • Office button → Close: When you close a document, Word checks to see if you’ve made any changes to the file. When you’ve made changes, Word always asks whether you’d like to save the document.


By Miss Shabana Sheikh And
By Sir Sajjad Akber Chandio